Fixing issues
Whether your issue is about a potential security problem, considered to be a bad coding practice, or a more serious logic error, fixing issues usually involves changes to the code. SonarQube for IDE’s issue messages contain useful information about how to fix the potential problem and include a rule description so that you can learn more about why the issue is reported.
SonarQube for IntelliJ offers multiple ways to Investigate issues and fix problems in your code. Issues are most easily fixed by correcting the problem as it is described in the Sonar rule description but it’s not always that simple:
- Check the rule description to understand what the problem is.
- Check the locations tab to see where, if any other places the issue is found.
Double-click an issue in the SonarQube for IDE view window to jump to and highlight the code in the explorer. Once the code is highlighted, you have more than one way to expose solutions and suggested quick fixes.
Quick fixes
Some issues have Sonar Quick Fixes which means that with a single click, SonarQube for IDE will automatically edit your source code to comply with the rule description; the fix might be applied on several lines in the file. While in the explorer window, type Alt+Enter (or option+Enter on Mac OS), select the lightbulb in the left margin, or hover over the highlighted issue to reveal the tooltip exposing these options:
- Fix the issue in the code: Cmd+↓/Ctrl+↓ or double-click the issue report to jump to the line of code in the explorer window. When hovering over the quick fix, a preview is available to show you what will change in the code if you select it.
- Disable the rule: Go to your IntelliJ Settings > Tools > SonarQube for IDE > Rules and find the applicable rule per language. Some Sonar Rules are disabled by default because they overlap with the built-in IntelliJ code inspection; it doesn’t make sense to report the same issue twice. Note that when running in connected mode, rule configurations are fetched from the project’s quality profile and used by SonarQube for IDE, overriding any local configuration of your rule selection in the IDE.
If there is a Sonar Quick Fix available for your issue, an AI CodeFix will not be offered.
AI CodeFix in your IDE
If you're running in connected mode with SonarQube Server or SonarQube Cloud, you might see the icon which means that there is an AI-generated fix suggestion available. Please check the requirements for using AI CodeFix in your IDE.

Fixing injection vulnerabilities
Because the detection of taint vulnerabilities requires that you run in connected mode, any changes you make to the code must be analyzed by your instance of SonarQube (Server, Cloud). Here are two options to resolve taint vulnerabilities displayed by SonarQube for IDE:
- After you fix the taint vulnerability in your IDE, commit your code to the server and rerun the analysis on SonarQube (Server, Cloud). The new status (of the vulnerability) will be reflected in your IDE.
- Go to the issue in SonarQube (Server, Cloud) and mark it as Accept or False positive. The new status will be updated locally in less than one minute.
When running in connected mode with SonarQube Server 10.4 or newer, Won’t Fix becomes Accept.
To investigate injection vulnerabilities (also called taint vulnerabilities) when running in Connected mode, double-click on the issue shown in the Taint vulnerabilities tab to open the location in the Code Explorer (as you would with other issues). The tooltip and rule descriptions will reveal information about how to fix your issues.
Some Taint Vulnerabilities are eligible for getting AI-generated fix suggestions in the IDE. Please check the requirements for using AI CodeFix in your IDE, including the information on how to spot eligible issues in your IDE.
Understanding changes in your code
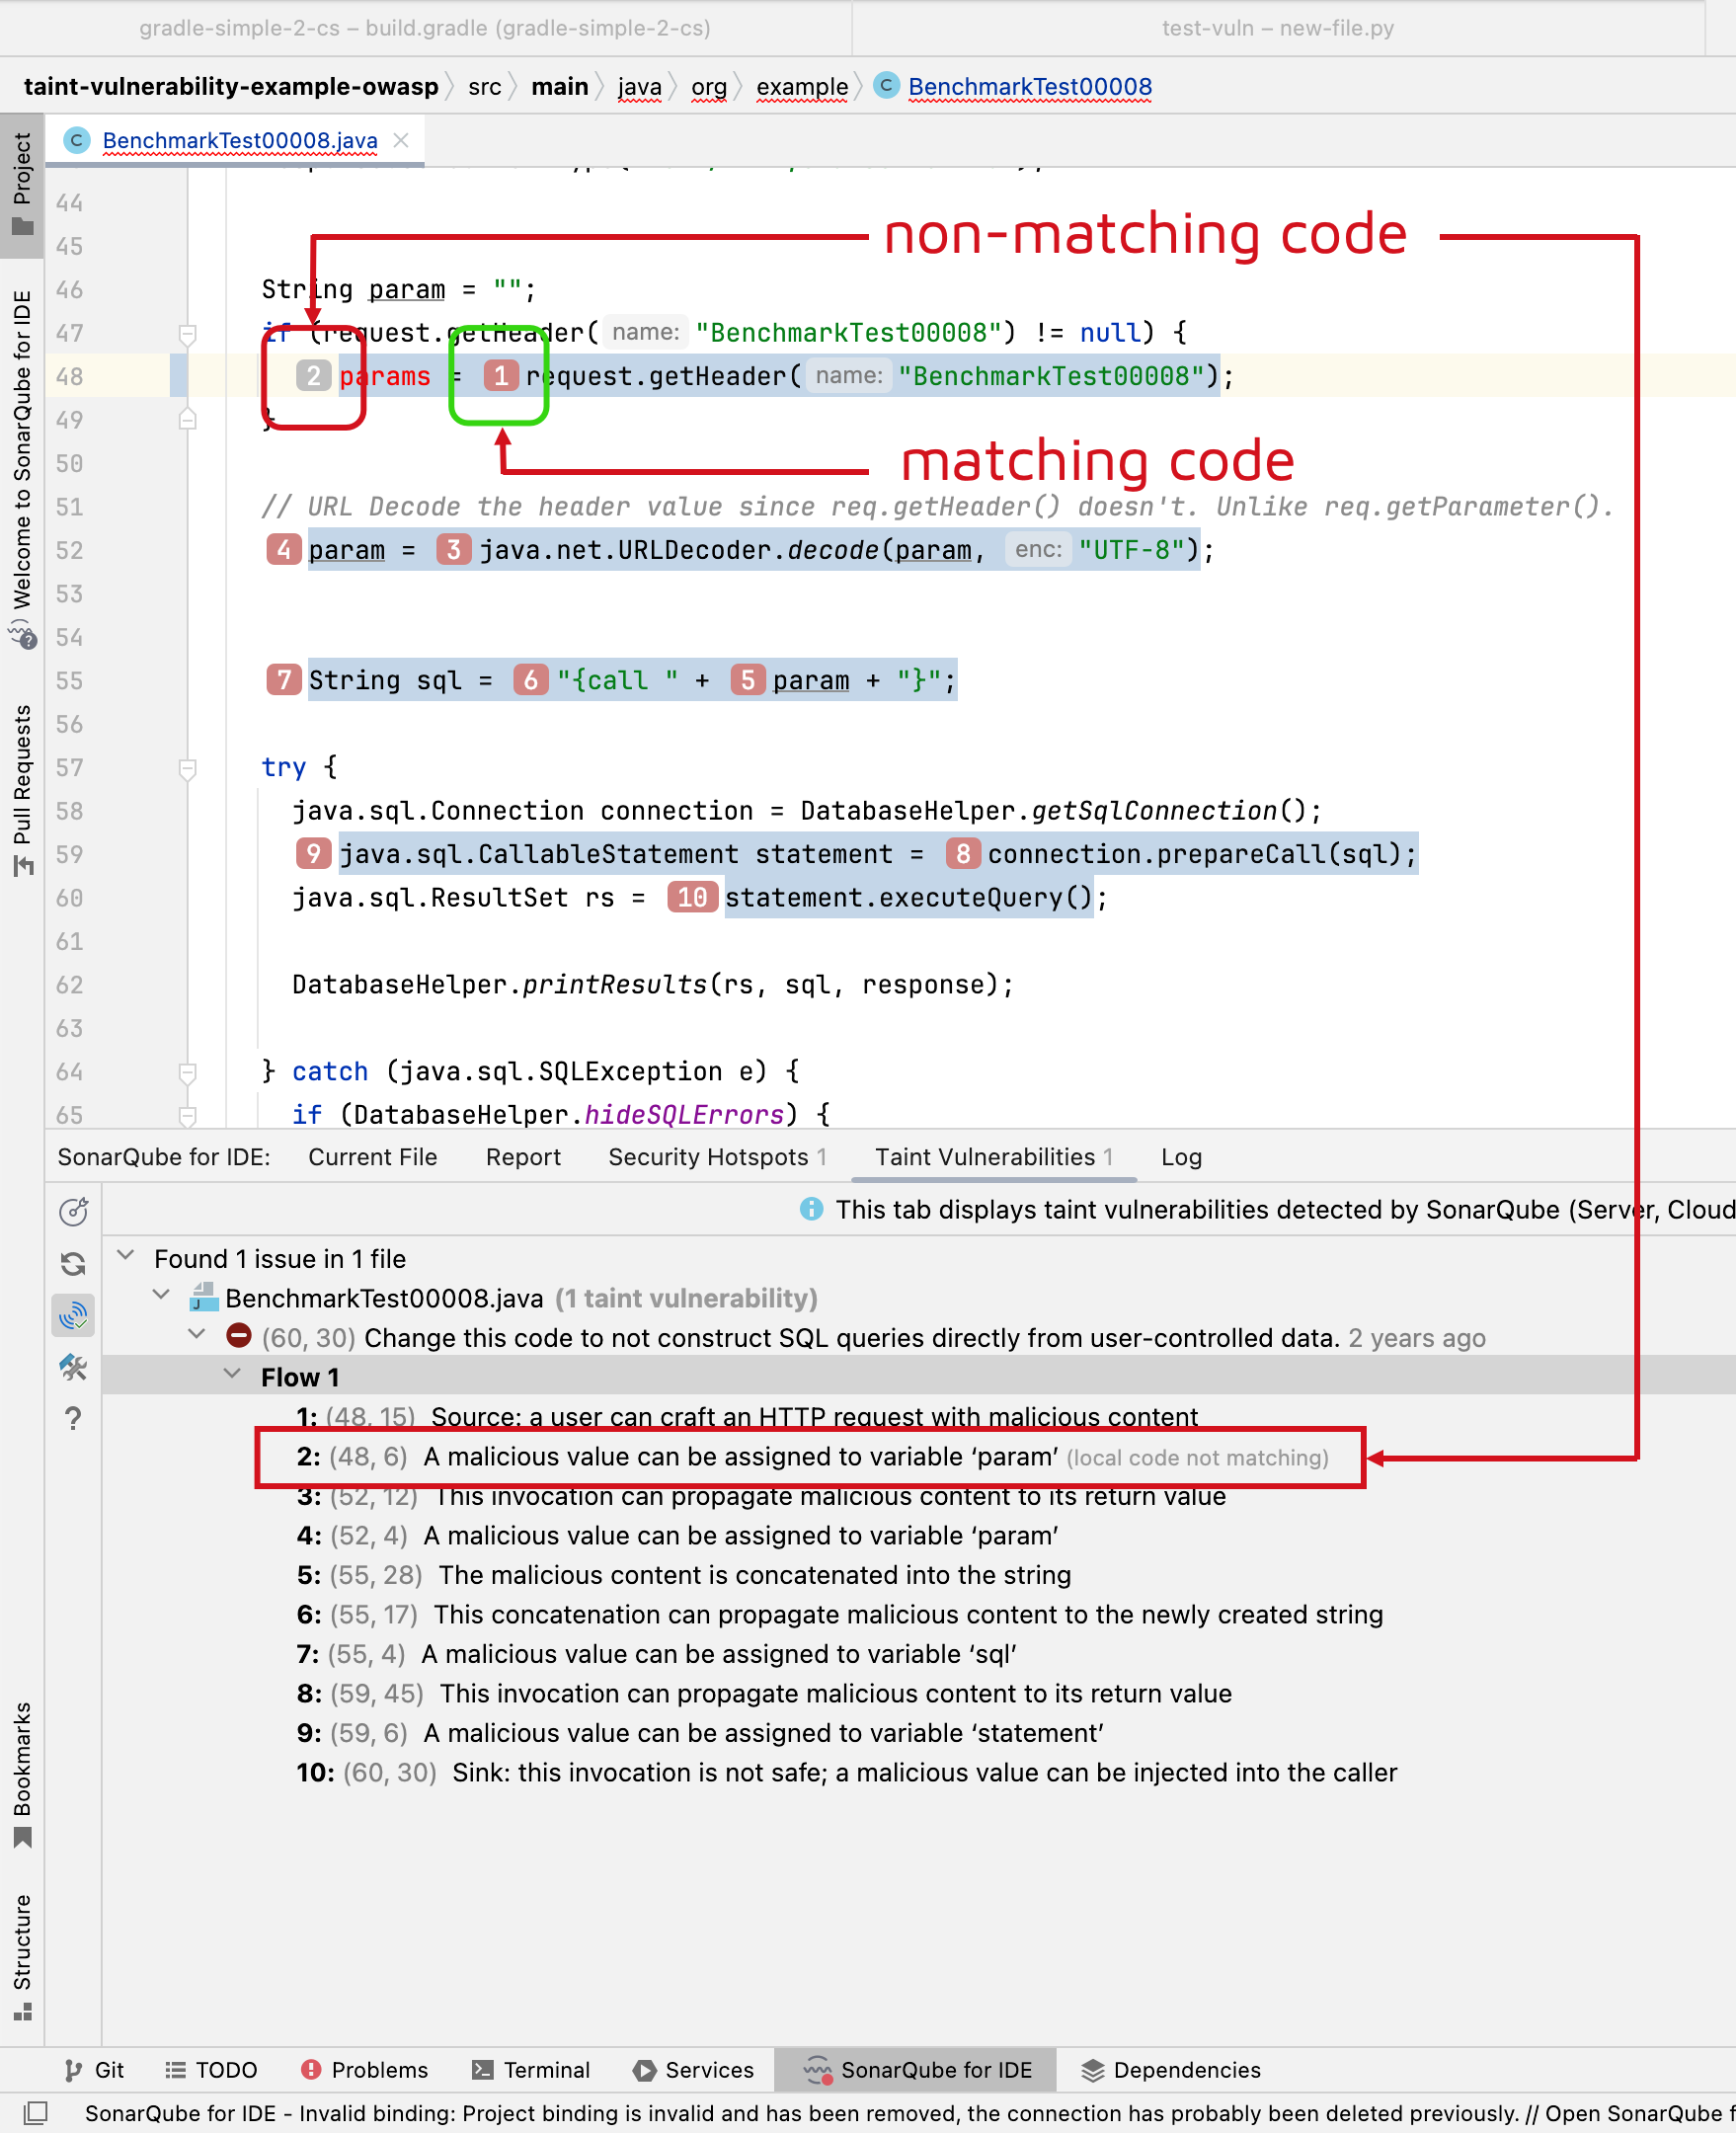
It could be that the local code does not match with the instance on the server. For example, when you are performing modifications, your code may be different than the server code as analyzed at the time when the issue was detected. In this case, the issue in the Taint vulnerabilities tab has a local code not matching tag, signifying that your local code is a bit different than what it is on the server: the numbered inlay (in the code editor) will be grey. In contrast, if the local code matches the issue on the server, it will have a numbered inlay in red.

The solution to managing differences in code depends on your goal at the time. It could be that you are actively updating your local branch, in which case you should merge your branch with the main branch and re-run an analysis. It could be that your local branch is behind the main branch. In this case, you can click the Refresh button in the left margin of the SonarQube for IDE view window to pull an updated report from the server.
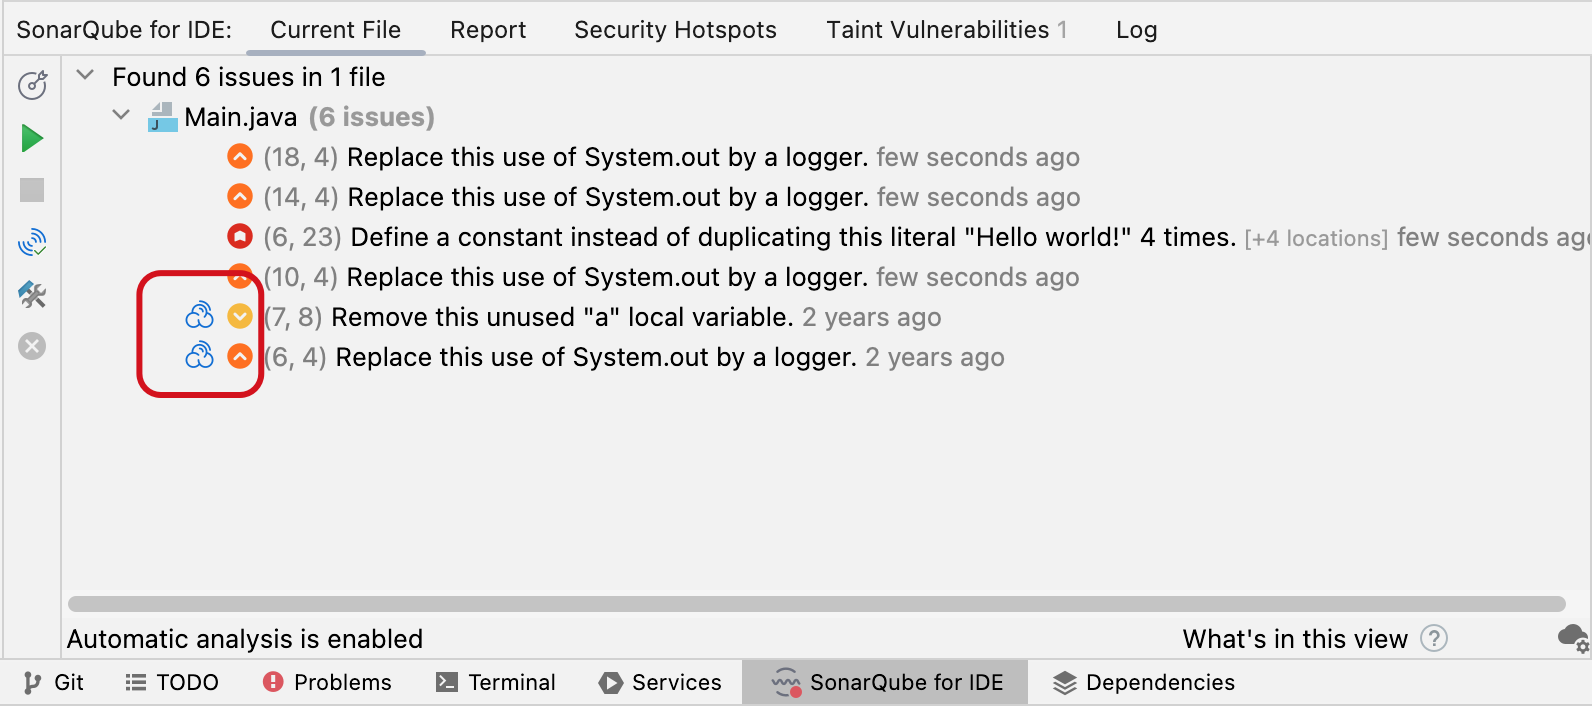
When running in Connected mode, SonarQube for IDE will differentiate known issues from new issues. Known issues are those discovered in a SonarQube (Server, Cloud) analysis and will have an additional SonarQube (Server, Cloud) icon in SonarQube for IDE. The image below shows a known issue.

Marking issues
In SonarQube for IntelliJ 9.0+ running in Connected mode with SonarQube Server 10.2 and newer, it is possible to mark issues as Won’t Fix or False Positive before submitting your code for PR analysis.
When running in connected mode with SonarQube Server 10.4 or newer, Won’t Fix becomes Accept.
Marking an issue can be applied to both new issues and known issues. Marks made on known issues will be reflected on the SonarQube (Server, Cloud) server within a few minutes; marks made on new issues will be reflected on the server when a new analysis is run; in version 9.1, marking new issues is not yet possible when bound to a SonarQube Cloud project. The option to mark an issue will not appear if you are connected to an unsupported version of SonarQube (Server, Cloud).
You can find the Mark Issue as… action in four locations:
- Right-click on an issue in the Current File tab and select Mark Issue as…
- Select an issue in the Current File tab to open the rule description in the Rule panel, then select the Mark Issue as…
- Hover over your issue in the code editor to bring up the actions menu, then select SonarQube for IDE: Mark Issue as…
- Apply an intention action with your cursor over the issue, then select SonarQube for IDE: Mark Issue as…; clicking on the lightbulb will reveal the same intention action
Requirements for marking issues
- SonarQube for IntelliJ 9.0.
- Running in connected mode with SonarQube Server 10.2 or newer. When bound to a project in SonarQube Cloud, it is possible to mark known issues, those already found by a SonarQube Cloud analysis.
- In SonarQube Server, the Administer Issues permission must be granted to the user(s).
This feature is not supported for security hotspots. It is possible to mark injection vulnerabilities from IntelliJ but it’s not possible to reopen them locally. Please see the dedicated pages for fixing each of those each issue types.
In SonarQube for IntelliJ versions 8.4 & 8.5, it’s possible to mark issues already known in SonarQube (Server, Cloud). Version 9.0 allows users to mark issues before they are analyzed by SonarQube Server 10.2.
When running in connected mode with SonarQube Cloud, it is possible to resolve and reopen known issues locally, but it’s not possible to mark new issues.
Was this page helpful?