Previous versions
Please remember that SonarSource officially supports only the latest version of SonarQube for Visual Studio.
Installing previous versions
You can install an earlier version by downloading the appropriate asset from the Releases page before following the Offline installation instructions.
Legacy Connected Mode
Connection setup for version 8.6 and earlier
Unbinding a project
To unbind a SonarQube Server or SonarQube Cloud project, delete the bindings folder associated with your project.
Each bound solution will have a unique folder in the %AppData%\Roaming\SonarLint for Visual Studio\Bindings folder; delete the correct project folder to remove the binding.
SonarQube for Visual Studio versions 8.9 and earlier, must use this procedure to unbind a project.
Updating your credentials
Unfortunately, you cannot update your SonarQube Server or SonarQube Cloud credentials in SonarLint for Visual Studio. Should, for example, your SonarQube Server or SonarQube Cloud user token expire and you want to keep using Connected Mode, you must delete and recreate the connection. Here is the procedure:
- If you have any project bound to the connection you want to delete, first manually delete each binding (bound with that connection) as described above in Unbinding a project.
- If there is no project binding, move on to Step 2.
- Open the SonarLint Manage Project Binding wizard (Extensions > SonarLint > Connected Mode > Bind to SonarQube or SonarCloud…), select Manage connections and delete the connection you want to remove. You cannot delete a connection if it has a project binding.
- Finally, recreate your connection with your new token and rebind your project.
Connection setup for version 8.3 and earlier
The Visual Studio Team Explorer window was used to set up connected mode in SonarLint for Visual Studio 8.3 and earlier. Here are the basic instructions for the first-time setup of Connected Mode and the details about how to save and share the setup with your team.
Using the connection wizard
Connected Mode setup
Step 1
In Visual Studio, go to Extensions > SonarLint > Connected mode and select Bind to SonarQube or SonarCloud…, this will open the SonarQube Connections tab in the Team Explorer window. Although the tab reads SonarQube, it is used for connecting to both SonarQube and SonarCloud.

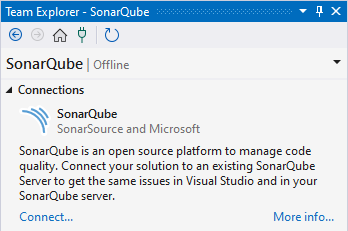
If you see a checkbox to choose Use Shared Binding Configuration, someone in your team has already setup a configuration. If you want to use this shared connection, stop, and skip to the Bind using shared configuration paragraph below.
Step 2
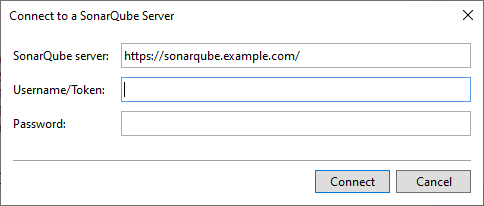
For new connections, click Connect… to open the connection dialog box.
The Connect to a SonarQube Server tab is used for connecting to both SonarQube and SonarCloud.
Step 3
In the SonarQube Server field:
- If you’re connecting to SonarQube: enter your SonarQube server address.
- If you’re connecting to SonarCloud: enter your SonarCloud server URL that starts with
https://sonarcloud.io

Step 4
In the Username/Token field, enter a SonarQube or SonarCloud user token and leave the Password field blank.
- In SonarQube, navigate to User > My Account > Security, or complete this URL,
https://<your-sonarqube-url>/account/security/, to generate a new user token. - In SonarCloud, navigate to User > My Account > Security, or use this URL,
https://sonarcloud.io/account/security, to generate a new user token.
User tokens are required when setting up Connected Mode between SonarQube and SonarLint. Note that the binding will not function properly if project tokens or global tokens are used during the setup process.
Step 5
Click Connect to set up the connection.
Step 6
(for SonarCloud only) Select the organization you want to bind to and click OK. To bind to a third-party organization that is not on the list, go to Other organizations and enter the organization key from that organization.
- Your SonarCloud Organization Key can be found by going to your SonarCloud Account > Organizations page:
https://sonarcloud.io/account/organizations. Keys for third party organizations can be found by going to the project's information page (in SonarQube Cloud).
The SonarQube tab now displays your projects and you will also see your organization listed if you are connected to SonarCloud.

To create and deploy a Shared Connections Binding file, follow the Configure the binding, and Save and share your setup instructions.
Configure your binding
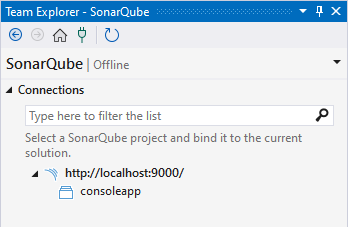
Bind your project
To bind a project, go to Visual Studio Team Explorer > Your SonarQube instance and double-click the project you want to bind; alternatively, you can right-click on your project and select Bind.


The Connected Mode binding settings are written under %AppData%\Roaming\SonarLint for Visual Studio\Bindings. Each bound solution will have its own folder.
SonarLint automatically fetches the required settings from the server and creates local configuration files. To manually trigger an update, go to Visual Studio Team Explorer > SonarQube, right-click the project whose binding you want to update, and select Update.
To share your binding configuration, follow the Save and share your setup instructions.
For Tfvc users
Additional notes for Tfvc users
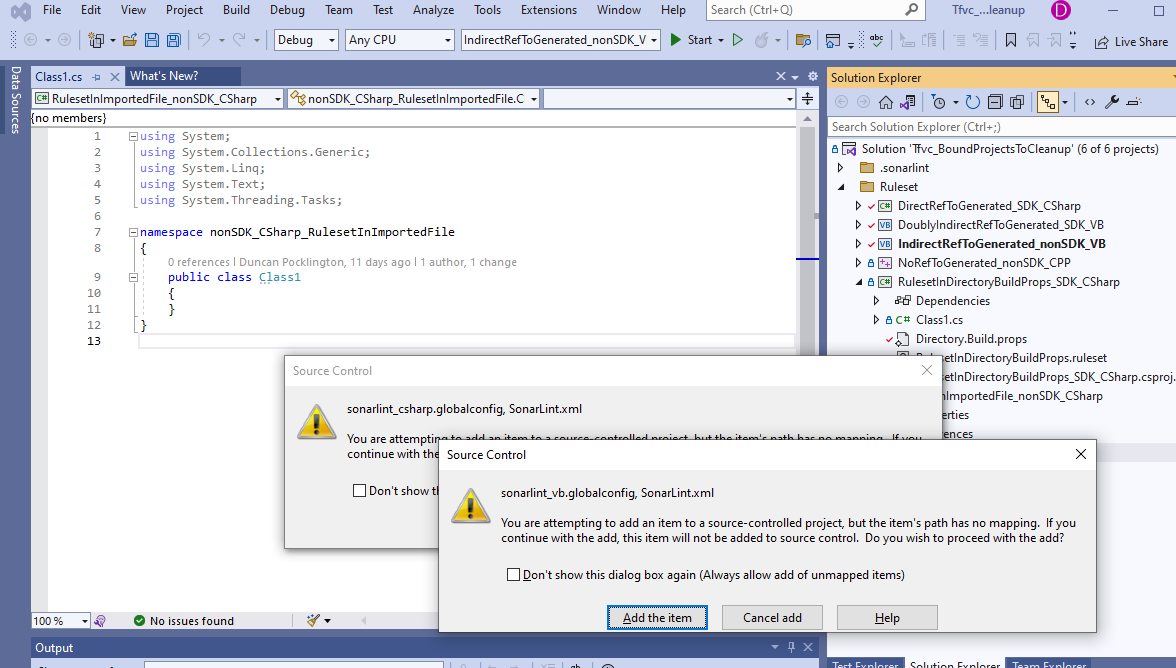
If you are using Team Foundation Version Control and have C# or VB.NET projects in your solution, it is possible that you will see some additional dialogs from Tfvc appearing when binding finishes. If your solution does not contain C# or VB.NET projects, you can disregard the rest of this section.
Tfvc might pop up one or more dialogs like the one below warning that files outside the workspace are being referenced and asking for confirmation that this is ok. These files are used to configure analysis for C# and VB.NET, and do not need to be under source control. Select Add the item to dismiss the dialog.

Once you have dismissed the Tfvc dialogs, they should not appear again.
Save and share your setup: Recommended for teams
Save the connection binding
After completing the steps outlined in the Using the connection wizard section above, go to Visual Studio Extensions > SonarLint > Connected mode and select Export Binding Configuration.
A .json file will be added to your .sonarlint folder containing the SonarQube URI & Project Key, or SonarCloud Organization & Project Key.
Share the connection binding
Commit the file you just created in the working directory; your teammates should have access to the binding configuration once your commit becomes part of the repository.
Because your Project’s identifying information is saved in a location under source control, it will be available to anyone with access to the project repo. Each team member is still required to have their own SonarQube (Server, Cloud) credentials; these are managed in SonarQube Server and SonarQube Cloud, respectively
Bind from a shared configuration
Bind using shared configuration
Once the shared project configuration has been saved by one team member, additional team members will have a streamlined process when configuring their project binding. To achieve this, SonarLint automatically looks for the .sonarlint folder; if it’s available and the shared configuration file is there, SonarLint will offer you a gold bar to streamline the setup.


Select the Bind option from the gold bar to set up your connection to the server using the shared settings. If you wish to opt-out, use of the shared connection settings are available when you start a new connection setup. If you're not already connected to an instance of SonarQube or to an Organization in SonarCloud, you'll need to add your user token.
Manage your binding in version 8.3 and earlier
Some parts of the Visual Studio Team Explorer window are used to manage your binding in earlier versions of SonarLint for Visual Studio.
Bind using shared configuration
If someone in your team has properly created a shared connection, SonarLint for Visual Studio find the connection file in the .sonarlint folder and offer you a gold bar to streamline the setup.
Select the Bind option from the gold bar to set up your connection to the server using the shared settings. If you wish to opt-out, use of the shared connection settings are available when you start a new connection setup. If you're not already connected to an instance of SonarQube or to an Organization in SonarCloud, you'll need to add your user token.
In the Username/Token field, enter a SonarQube or SonarCloud user token and leave the Password field blank.
- In SonarQube, navigate to User > My Account > Security, or complete this URL,
https://<your-sonarqube-url>/account/security/, to generate a new user token. - In SonarCloud, navigate to User > My Account > Security, or use this URL,
https://sonarcloud.io/account/security, to generate a new user token.
If no gold bar is available, in Visual Studio, go to Extensions > SonarLint > Connected mode and select Bind to SonarQube or SonarCloud…, this will open the SonarQube Connections tab:
- Simply select the Use Shared Binding Configuration checkbox and click Connect…. If you’re not already connected to the same instance of SonarQube or SonarCloud, you will be prompted to enter your token (as it's described in the bullet points above); with the correct stored credentials, the project will bind immediately with a single click.


Connection setup for version 6.16 and earlier
Before SonarLint for Visual Studio version 7.0
Before SonarLint for Visual Studio version 7.0 (released in June 2023), Connected Mode behaved a bit differently:
- In versions 6.16 and earlier, SonarLint saved all of its configuration files inside the solution project folder, and it was up to the user to commit or exclude the Sonar settings. This caused some version control management problems, especially when syncing with the server in Connected Mode.
- From version 7.0 and newer, the settings folder was moved outside of the solution directory to the
%AppData%\Roaming\SonarLint for Visual Studio\Bindingsfolder.
Before SonarLint for Visual Studio version 4.0 (released in May 2018), Connected Mode behaved a bit differently:
- The appropriate NuGet package for the
SonarAnalyzer.CSharp/SonarAnalyzer.VisualBasicanalyzers were added to each project. - The Connected Mode settings were saved in a solution-level folder called SonarQube in a file called
SolutionBinding.sqconfig. - If you are upgrading to version 7.0 from Sonarlint version 3.10 or earlier, please check the Migrate Connected Mode to v7 page for instructions.
In SonarLint for Visual Studio version 4.0 and later:
- The analyzer NuGet packages are no longer installed in any project
- The settings are saved in a solution-level folder called
.sonarlintin a file called[solution name].slconfig.
Updating your credentials
Unfortunately, in all versions of SonarLint for Visual Studio in 8.4 and earlier, there is no SonarLint mechanism to update your SonarQube Server or SonarQube Cloud credentials if, for example, your token expires; however, the token is stored in the Windows Credential Manager and can be edited or deleted.
Navigate to the Windows Control Panel > User Accounts > Credential Manager > Windows Credentials and either update the password with your new token or delete your token. Then restart your IDE.
- The name for your SonarQube credentials is:
Sonarlint.VisualStudio.Integration:<your-sonarqube-URL> - The name for your SonarCloud credentials is:
Sonarlint.VisualStudio.Integration:https://sonarcloud.io/<your-sonarcloud-organization>
If you choose to delete the token, when you try to connect again, SonarLint will prompt you for a new token during the connection setup.
Connected Mode for C# and VB projects
Legacy binding instructions for C# and VB projects
Connected Mode for C# and VB projects v6.16 and earlier
When binding to SonarQube/SonarCloud, SLVS generates configuration files that are needed for Sonar C# and Sonar VB.NET analyzers. The following configuration files are generated for each language:
- a
.rulesetfile that contains the rules configuration corresponding to the Quality Profile (See the Microsoft documentation for Rule sets) - a
SonarLint.xmlfile which contains the rules parameters for Sonar C# and Sonar VB.NET analyzers.
The configuration files are located under the .sonarlint folder in your solution directory.
Each non-test project under your solution needs to reference all of these files in order to be considered as correctly bound. If one of the configuration files is not referenced, the project is considered as unbound and SLVS will prompt you to bind it.
How does SLVS recognize that the configuration files are referenced?
The generated ruleset is specified in the CodeAnalysisRuleSet property e.g.
<PropertyGroup>
<CodeAnalysisRuleSet>path-to-generated-ruleset.ruleset</CodeAnalysisRuleSet>
</PropertyGroup>The SonarLint.xml file is referenced as an AdditionalFiles item e.g.
<ItemGroup>
  <AdditionalFiles Include="..\.sonarlint\{language}\SonarLint.xml" />
</ItemGroup>
What happens when SLVS binds my C# / VB.NET projects?
If SLVS recognizes that the project does not reference the generated .ruleset file, SLVS will reference it using the following logic:
If the project has no CodeAnalysisRuleSet properties, SLVS will create one and point to the generated .ruleset file. So your project will look like this:
<PropertyGroup>
  <CodeAnalysisRuleSet>path-to-generated-ruleset.ruleset</CodeAnalysisRuleSet>
</PropertyGroup>
If the project has a CodeAnalysisRuleSet property that points to a .ruleset file that is located under the project’s directory, SLVS will amend that ruleset to reference the generated .ruleset file. So your project’s ruleset file will look like this:
<?xml version="1.0" encoding="utf-8"?>
<RuleSet Name="My ruleset" Description="test" ToolsVersion="16.0">
  <Include Path="path-to-generated-ruleset.ruleset" Action="Default" />
  ...
If the project has a CodeAnalysisRuleSet property that points to a .ruleset file that is not located under the project’s directory, SLVS will create a new .ruleset file and place it under your project’s directory. The new ruleset file references your previous ruleset and Sonar’s generated .ruleset file. So the new ruleset file will look like this:
<?xml version="1.0" encoding="utf-8"?>
<RuleSet Name="SonarQube - Sonar way" ToolsVersion="14.0">
  <Include Path="path-to-generated-ruleset.ruleset" Action="Default" />
  <Include Path="path-to-your-other-ruleset.ruleset" Action="Default" />
</RuleSet>
Can I customize how my projects are configured?
Yes. The initial binding described above will correctly configure your projects, but you are free to modify this using the standard capabilities of MSBuild e.g. using a Directory.Build.props file, or putting the references in a common targets file that is included in the appropriate projects.
FYI the SonarLint for Visual Studio solution in this repo uses a Directory.Build.props file (see here). It does not contain any project-level rulesets or settings.
See our documentation on how to configure a reference to project rulesets, and Microsoft’s documentation for customizing your build.
Prior versions v7.2-current
Get a reproducer file for C or C++ Analysis
Troubleshooting C or C++ Analysis
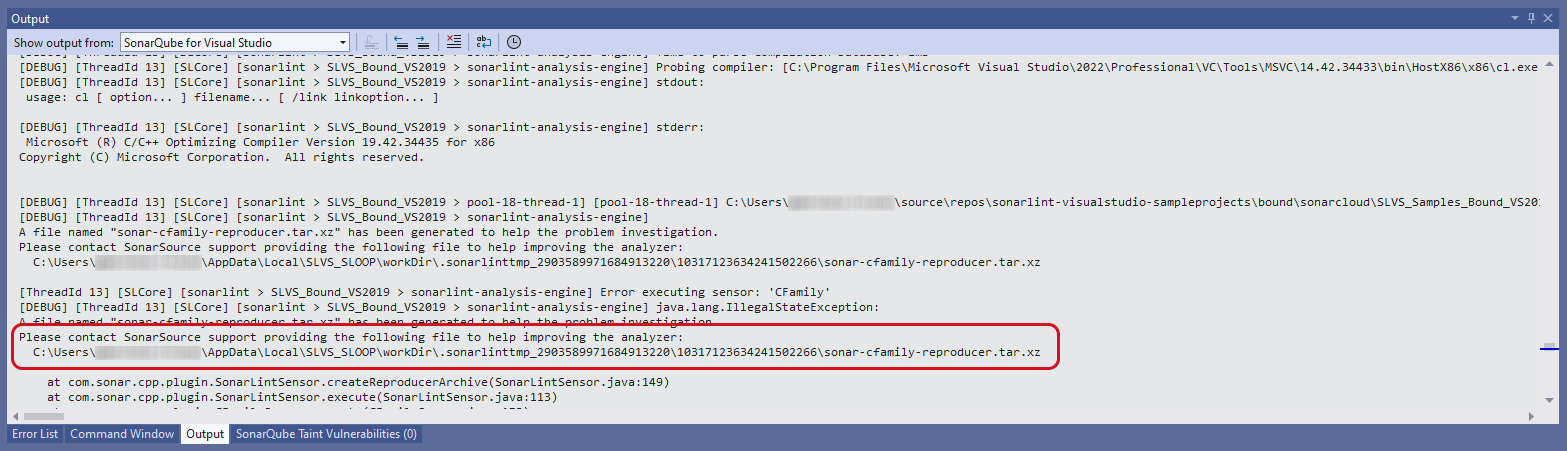
You can create a reproducer file for C and C++ analysis that contains diagnostic information to help the developers at SonarSource investigate problems that occur in your analyses. Beginning in SonarQube for Visual Studio 8.10, the reproducer file may contain sensitive data about your machine's environment variables. *Please take this into account when sharing your files.
If you encounter a problem with C or C++ analysis, please contact us in the Sonar Community forum and include the reproducer file. Follow the instructions below for complete instructions on how to do this.
Creating a reproducer file for the Active Document
To create a reproducer:
- Open the C or C++ file that is not being analyzed correctly
- Open Visual Studio's Command Window, found under View > Other Windows > Command Window.
- Type in the command window:
Analyze.SonarLint.CFamily.CreateReproducer


You can then view the location of the created reproducer file(s) in the SonarQube for Visual Studio Output pane. Be certain to set your logging level to Verbose, and show the output from SonarQube for Visual Studio.

Notes:
- The reproducer file(s) are regenerated each time the command is invoked. Invoking the command will overwrite the previous reproducer file(s).
- Running the reproducer will only produce the reproducer file(s). It will not report any issues for the active C or C++ file, which might be helpful for your post to the Community or via your SonarQube support subscription.
Prior versions v4.13-7.2
Define C, C++, JS, TS or secrets detection rules for local analysis in version 4.13-7.2
In SonarLint for Visual Studio 7.3 and newer, changing the Sonar severity of an issue is no longer possible.
In standalone mode, it is possible to enable or disable rules, configure rule parameters, and in versions 4.13-7.2, change the reported rule severity. Not all options are supported for all languages. See the table below for more information.
Rule management support in versions 4.13-7.2
| Language | From version | Enable/disable | Change severity | Configure rule parameters |
|---|---|---|---|---|
| C | 4.13 | Supported | Supported in v4.13-7.2 | Supported |
| C++ | 4.13 | Supported | Supported in v4.13-7.2 | Supported |
| JavaScript | 4.35 | Supported | Not supported. See #2399. | Not supported. See #2400. |
| TypeScript | 4.35 | Supported | Not supported. See #2399. | Not supported. See #2400. |
| Secrets detection | 6.4 | Supported | Not Supported | Not applicable |
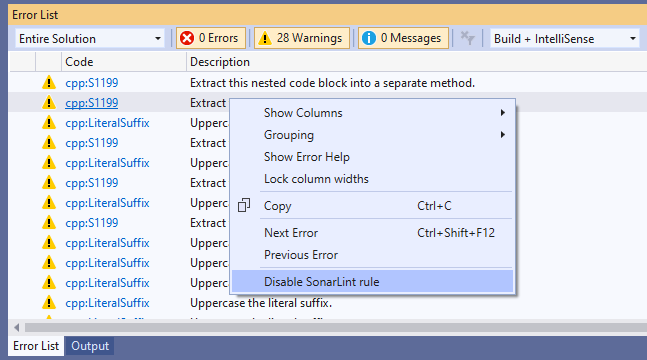
Disabling a rule
To disable a rule, select an instance of the rule in the Error List and select the Disable SonarLint rule command on the context menu:

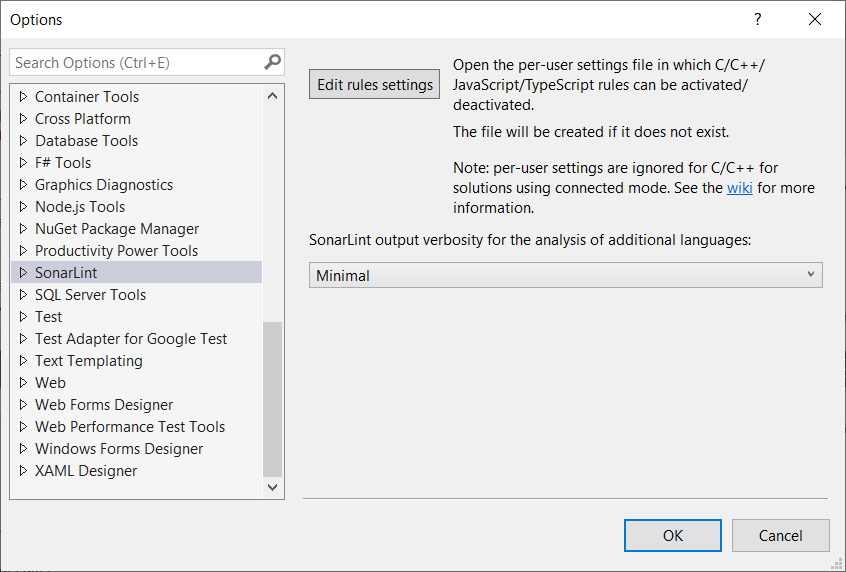
You can view and change the current rule settings by selecting Edit rules settings from the SonarLint > Tools > Options page:

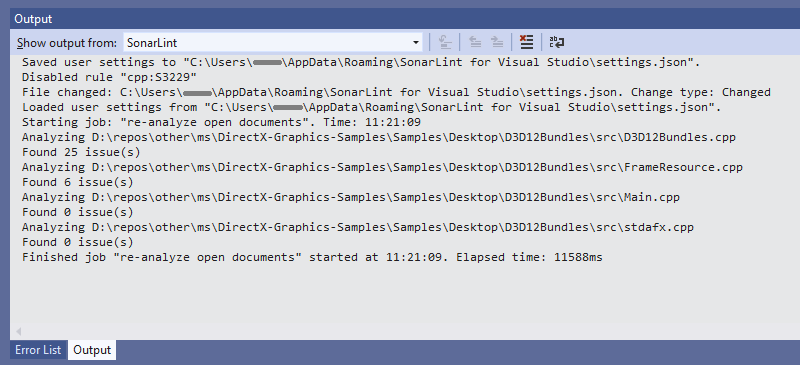
When the rule settings are changed (either by using the Disable SonarLint rule command or by directly editing and saving the settings.json file), SonarLint will automatically re-analyze all open documents.
The SonarLint Output window tab contains text output describing the processing that has taken place; see this example:

settings.json file format and location
The settings.json file is stored in user's roaming profile %APPDATA%\SonarLint for Visual Studio. It applies to all supported versions of Visual Studio. If the machine is domain-joined, then the settings file will be automatically copied to any other machine in the domain that the user logs on to.
The format of the settings file is as follows:
{
 "sonarlint.rules": {
   "c:S1135": {
     "level": "On",
     "severity": "Info"
   },
   "cpp:S1199": {
     "level": "Off",
     "severity": "Minor"
   },
   "javascript:S1135": {
     "level": "Off"
   },
   "typescript:S1854": {
     "level": "On"
   }
 }
}
The format of the rule key in the file is [c|cpp|javascript|typescript]:[rule id]. The full list of rules is available at https://rules.sonarsource.com/.
Valid severity values are Blocker, Critical, Major, Minor and Info. Changing the severity of a rule only affects the label in the Category column in the Error List.
If the settings file does not contain an entry for a rule then the default setting for the rule in the Sonar way Quality Profile will be used.
Note: if the solution is in Connected Mode then the settings file is ignored. Connected Mode is not currently for JavaScript or TypeScript - see #770. It is also not available for Secrets detection rules, which are only run in the IDE and so cannot be configured on the server.
Troubleshooting C or C++ Analysis
Troubleshooting C or C++ Analysis from version 4.21
Starting with version 4.21, it is possible to create a reproducer file for C and C++ analysis. A reproducer file contains diagnostic information to help the developers at SonarSource investigate problems that occur during C or C++ analysis.
Note: Starting with version 4.27, a second reproducer file is created with additional debug information.
If you encounter a problem with C or C++ analysis, please contact us in the Sonar Community forum and include the reproducer file(s).
Creating a reproducer file for the Active Document
To create a reproducer:
- open the C or C++ file that is not being analysed correctly
- open Visual Studio's Command Window, found under View > Other Windows > Command Window.
- type in the command window
Analyze.SonarLint.CFamily.CreateReproducer:
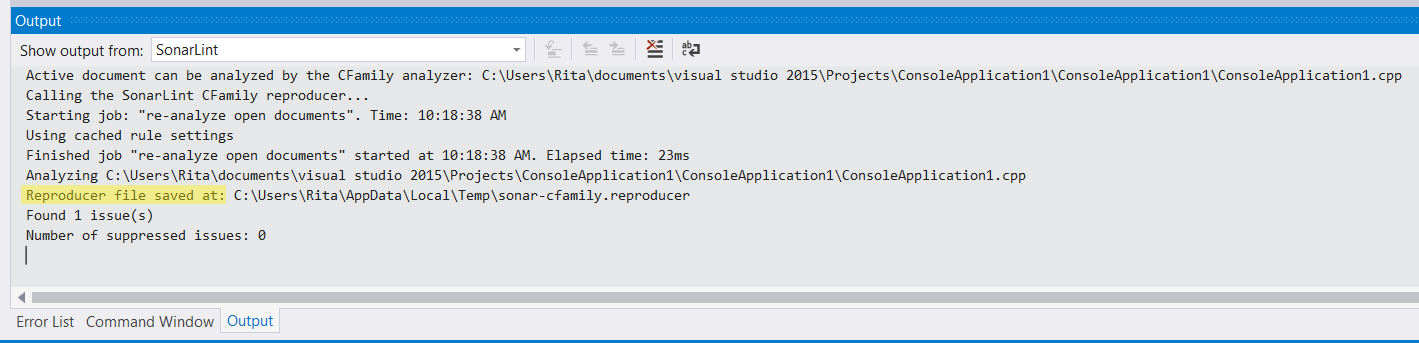
You can then view the location of the created reproducer file(s) in the SonarQube for Visual Studio Output pane:
Reproducer file in SonarLint 4.21-4.26

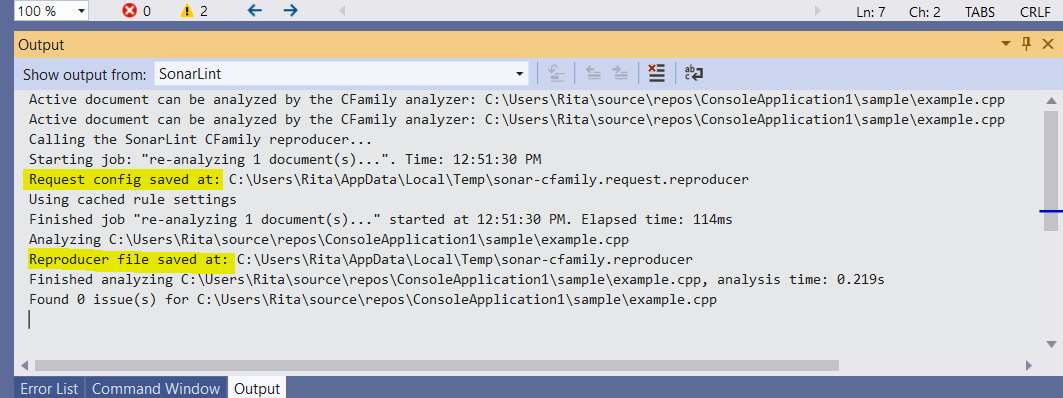
Reproducer files in SonarLint 4.27

Notes:
- The reproducer file(s) are regenerated each time the command is invoked. Invoking the command will overwrite the previous reproducer file(s).
- Running the reproducer will only produce the reproducer file(s). It will not report any issues for the active C or C++ file.
File exclusions in 6.16 and earlier
In SonarLint for Visual Studio 6.16 and earlier, the sonar.settings.json file which saves the server defined file exclusions lives in the local .sonarlint folder.
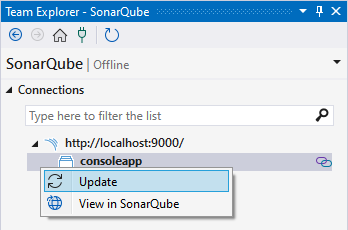
You must manually Update your binding to refresh the sonar.setting.json file when changes are made in SonarQube Server or SonarQube Cloud; go Team Explorer > SonarQube, right-click the project whose binding you want to update, and select Update:

Rule severity mapping before v7.2
The Sonar rule severities defined by SonarQube Server or SonarQube Cloud are different than the severities defined by Visual Studio. The mapping from Sonar severities to Visual Studio severities is as follows:
| SonarQube and SonarCloud | Visual Studio |
|---|---|
| Info | Info |
| Minor | Info |
| Major | Warning |
| Critical | Warning |
| Blocker | Warning |
By default Sonar Critical and Blocker issues are not mapped to Visual Studio Error as this would cause IDE builds to fail. You can change that by enabling Treat warnings as errors in your project properties in Visual Studio. If you are using Connected Mode, the rule severities defined in the Quality Profile will be used.
In SonarLint for Visual Studio 7.3 and newer, changing the Sonar severity of an issue is not possible.
Versions prior to v4.34
This section describes the behavior of SonarLint versions 4.34 or older. Javascript analysis is enabled by default in versions 4.34+.
Out of the box, SLVS will analyze C#, VB.NET, and C or C++. Support for additional languages requires the download of another component, the SonarLint daemon. This simply requires clicking a button in the Tools, Options, SonarLint tab as described below.
The only additional language currently supported is JavaScript, although it is likely this set of supported languages will increase in the future.
Enabling analysis of additional languages
To enable analysis of additional languages, select Tools, Options, SonarLint and click on the "Activate" button then clicking "OK". The SonarLint daemon binaries will be downloaded in the background, with the download progress being shown in the Visual Studio status bar.
Once the download has completed, JavaScript files will be analysed whenever you save them.
Specifying an alternative download location (SLVS v4.11 or later)
By default the additional binaries will be downloaded from the public site https://binaries.sonarsource.com/?prefix=Distribution/sonarlint-daemon/. If you are working in an environment in which developer machines do not have access to the public internet, you can host the required binaries yourself and set the environment variable SONARLINT_DAEMON_DOWNLOAD_URL to tell SLVS where to find the binaries.
There are few restrictions:
- the environment variable SONARLINT_DAEMON_DOWNLOAD_URL must be set before VS starts.
- the URL must be absolute.
- the daemon zip file must not be renamed i.e. it must in the format
sonarlint-daemon-{version}-windows.zip.
Changes to C/C++ analysis in SLVS v4.12
- Prior to SLVS v4.12 C++ was an additional language so C/C++ analysis would only occur if support for additional languages was enabled. Since v4.12 the C/C++ analysis binaries have been included in the SLVS VSIX so the SonarLint daemon is not required. If you were using SLVS to analyze C/C++ prior to v4.12, you no longer need to have support for additional languages enabled unless you also want JavaScript files to be analyzed.
The SonarLint daemon
Most of the Sonar analyzers are written in Java and so need to be run in a Java process. The SonarLint daemon is a Java component that runs in the background and hosts the supported Sonar analyzers. There is no need to have Java installed separately on your development machine - the SonarLint daemon download includes the necessary Java runtime files.
SLVS handles communication with the daemon behind the scenes. Informational messages about the daemon will appear in the SonarLint pane of the Visual Studio Output tool window. Otherwise, the existence of the daemon should be completely transparent to the end user: SonarLint for Visual Studio will take care of starting and stopping the daemon, passing files for analysis, processing the results, and displaying them in the Visual Studio Error List.
The daemon will only be started when you open a file that can be analyzed by the daemon, and it will be closed automatically when you close the solution containing the file (note that this was not the case prior to SLVS v4.12; in older versions of SLVS the daemon would start when VS started).
You can use the Task Manager to check whether the daemon is running:
| Field | Value |
| Process name | java.exe |
| Process description | OpenJDK Platform binary |
| File location | %LOCALAPPDATA%\SonarLint for Visual Studio\sonarlint-daemon-{version}-windows\jre\bin |
Troubleshooting previous versions
C or C++ Analysis in 8.20 and earlier
Reproducer files for C and C++
You can create a reproducer file for C and C++ analysis that contains diagnostic information to help the developers at SonarSource investigate problems that occur in your analyses. Beginning in SonarQube for Visual Studio 8.10, the reproducer file may contain sensitive data about your machine's environment variables. *Please take this into account when sharing your files.
If you encounter a problem with C or C++ analysis, please contact us in the Sonar Community forum and include the reproducer file. Follow the instructions below for complete instructions on how to do this.
Creating a reproducer file for the Active Document
To create a reproducer:
- Open the C or C++ file that is not being analyzed correctly
- Open Visual Studio's Command Window, found under View > Other Windows > Command Window.
- Type in the command window:
Analyze.SonarLint.CFamily.CreateReproducer
You can then view the location of the created reproducer file(s) in the SonarQube for Visual Studio Output pane. Be certain to set your logging level to Verbose, and show the output from SonarQube for Visual Studio.
Notes:
- The reproducer file(s) are regenerated each time the command is invoked. Invoking the command will overwrite the previous reproducer file(s).
- Running the reproducer will only produce the reproducer file(s). It will not report any issues for the active C or C++ file, which might be helpful for your post to the Community or via your SonarQube support subscription.
Was this page helpful?
© 2008-2025 SonarSource SA. All rights reserved.