> For the complete documentation index, see [llms.txt](https://docs.sonarsource.com/llms.txt). Markdown versions of documentation pages are available by appending `.md` to page URLs; this page is available as [Markdown](https://docs.sonarsource.com/sonarqube-cloud/analyzing-source-code/monorepo-support.md).
# Monorepo support
See this page for information about monorepo projects, how to set them up, and how to add your SonarQube Cloud analysis to your monorepo's CI pipeline.
SonarQube Cloud supports repositories that use the monorepo strategy.
## What is a monorepo?
Traditionally, software projects have been organized so that each project is stored within a single, distinct repository of its own.
As software projects have become more complex and interconnected, some organizations have moved to having all their projects in a single large repository. This is called the **monorepo strategy**.
In a typical monorepo, each project occupies its own directory within the repository and each is independently buildable and deployable, though the exact setup depends on how the procedures that build each project are defined. In general, there are many ways that multiple projects can be arranged within a single repository.
Fortunately, SonarQube Cloud’s support for the monorepo strategy does not depend on the specifics of the monorepo setup. SonarQube Cloud relies on the fact that each build procedure can be configured to perform the analysis for its particular project in the repository and send the result to the corresponding SonarQube Cloud project.
## About the monorepo support in SonarQube Cloud
In a standard setup, each SonarQube Cloud project corresponds to a single repository. In a monorepo setup, multiple SonarQube Cloud projects, each corresponding to a separate monorepo project, are all bound to the same repository. This way:
* The analysis setup of each project in the monorepo is easier.
* When you do an analysis, information from SonarQube Cloud that appears in the pull request view is clearly distinguished by project name.
* The monorepo associated with a project is shown in the SonarQube Cloud UI.
See the [Binding with the DevOps platform](/sonarqube-cloud/administering-sonarcloud/about-sonarqube-cloud-solution/resources-structure/binding-with-dop.md) page for information about project binding.
Currently, monorepo support is available for GitHub, Bitbucket Cloud, Azure DevOps and GitLab repositories. Note that the analysis of a monorepo configuration is only supported for the CI-based analysis, not for the automatic analysis.
## Setting up the analysis of your monorepo
Once you have set up your monorepo in SonarQube Cloud, you can add the SonarQube Cloud analysis to your monorepo’s CI pipeline.
### Before your start
A wizard guides you through setting up your monorepo in SonarQube Cloud. You can create the projects of your monorepo in two ways: add them manually one by one, or import a JSON file that lists them and create them in bulk. SonarQube Cloud can't detect projects within a monorepo automatically, so you provide the project list yourself with either method. To create the projects of a monorepo, you need the **Create Projects** permission in your organization.
Each SonarQube Cloud project must have a key unique across SonarQube Cloud (see [Parameters not settable in the UI](/sonarqube-cloud/analyzing-source-code/analysis-parameters/parameters-not-settable-in-ui.md#project-identification)). This is the key that you will use when you configure your CI service. We recommend using a pattern that includes your organization name, the monorepo name, and an internal reference to the project within the monorepo (for example, `myorg_mymonorepo_myproject`).
### Step 1: Set up your monorepo in SonarQube Cloud
During this step, you’ll import your monorepo to SonarQube Cloud and create its projects. Choose the method that suits your workflow:
{% tabs %}
{% tab title="Manual creation" %}
1. Select the ✚ (plus) menu on the top right of the SonarQube Cloud interface and select **Analyze new project**. The **Analyze projects** page opens.
2. Select **Setup a monorepo** (it is a small text link to the right of the **Organization** field). The **Analyze monorepo projects** page opens.
3. In **Organization**, select your organization.
4. In **Repository**, select the monorepo that you want to import.
5. Create the projects within your monorepo. For each project within your monorepo:
1. Select the **Add new project** button.
2. Review the proposed project name and key.
5. Once you’ve completed the project list, select the **Set up monorepo** button. The **Set up new code** page opens.
6. Select the New Code Definition (NCD) you want to apply by default to the SonarQube Cloud projects in the monorepo. More information about defining your NCD is on the [Defining new code](/sonarqube-server/10.5/project-administration/clean-as-you-code-settings/defining-new-code.md) page.
7. Select the **Create projects** button.
{% hint style="info" %}
If you select a repository that is already bound to SonarQube Cloud, then this creates new projects as part of a monorepo setup and converts the existing project, which is bound to the selected repository, to the monorepo.
{% endhint %}
{% endtab %}
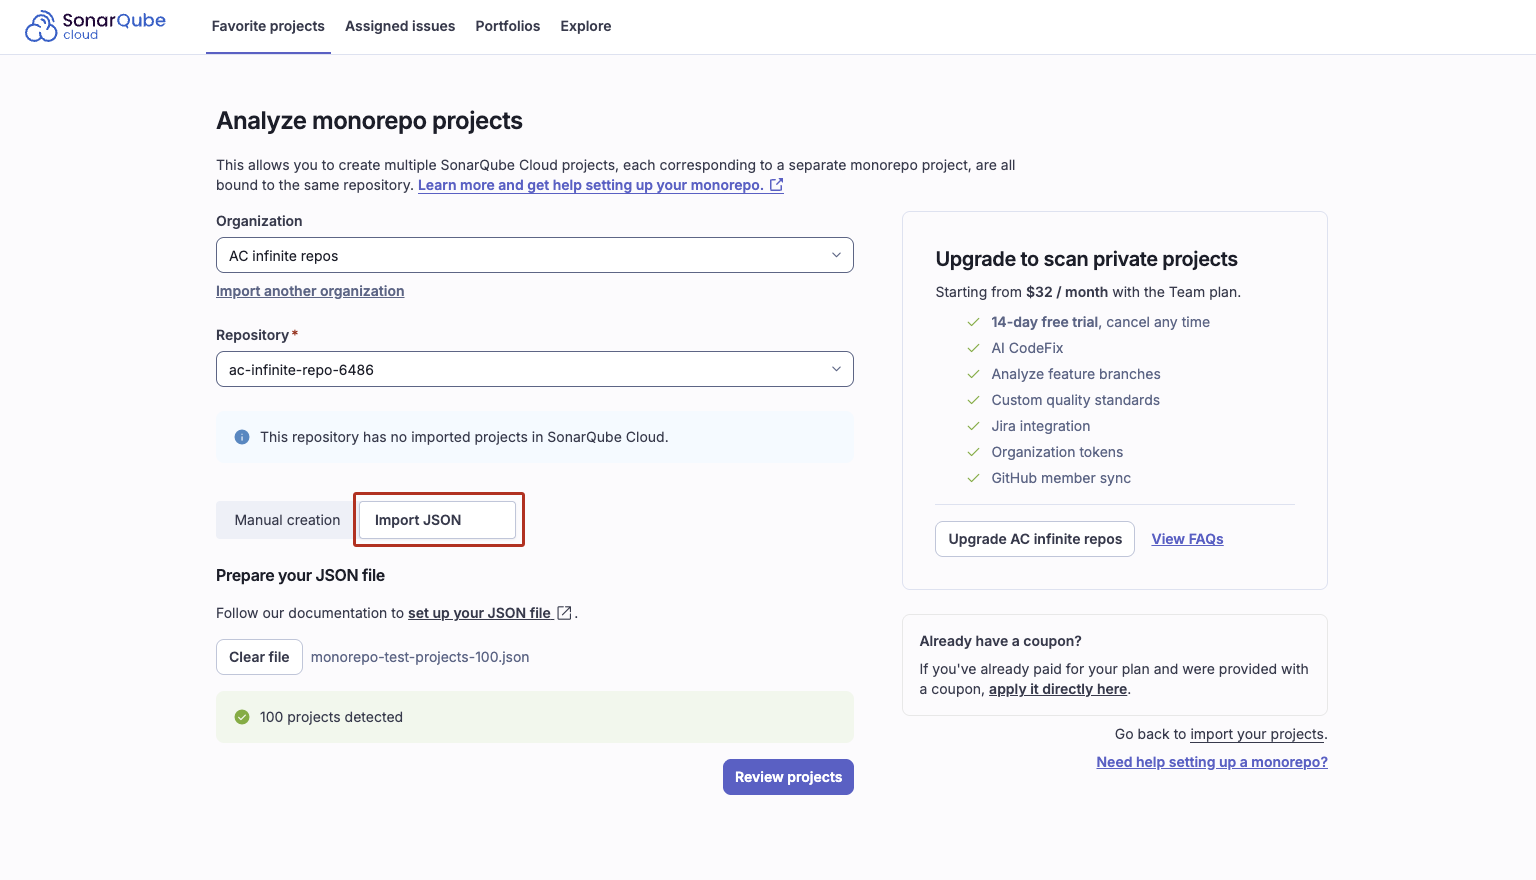
{% tab title="Import JSON" %}
Upload a JSON file listing the monorepo projects to create them all at once.
#### Prepare your JSON file
The file must be a JSON array where each entry has a `projectKey` and a `projectName`:
```json
[
{ "projectKey": "myorg_mymonorepo_api", "projectName": "API" },
{ "projectKey": "myorg_mymonorepo_web", "projectName": "Web app" }
]
```
* `projectKey` — a key that’s unique across SonarQube Cloud. Use the naming pattern described in "Before your start" above (for example, `myorg_mymonorepo_myproject`).
* `projectName` — the display name shown in SonarQube Cloud.
{% hint style="warning" %}
Entries with project keys already in use in your SonarQube Cloud organization are skipped during bulk import and must be provisioned manually. Unlike the manual flow, collisions are not surfaced before submission. We recommend following the monorepo project key naming convention shown in the example to avoid collisions with existing projects.
{% endhint %}
You can write this file by hand or generate it with an AI assistant or script.
#### Import the projects
1. Select the ✚ (plus) menu on the top right of the SonarQube Cloud interface and select **Analyze new project**. The **Analyze projects** page opens.
2. Select **Setup a monorepo** (it is a small text link to the right of the **Organization** field). The **Analyze monorepo projects** page opens.
3. In **Organization**, select your organization.
4. In **Repository**, select the monorepo that you want to import.
5. Select the **Import JSON** tab.
6. Upload your `.json` file. SonarQube Cloud validates it and shows how many projects were detected. If the file is invalid, you’ll see an error message.
7. Select **Review projects**. On the **Review your projects** page, deselect any project you don’t want to create. Projects that already exist in SonarQube Cloud are skipped automatically.
8. Select **Create projects**. A progress indicator shows each project being imported. You can **Stop importing** at any time — projects already imported are kept.
9. When the import finishes, you’re taken to your projects list. Select **View summary** to see successful and failed imports, and **Download CSV list** for a per-project report.
{% hint style="info" %}
The monorepo’s projects are created as a flat list in SonarQube Cloud — there’s no folder hierarchy.
{% endhint %}
{% endtab %}
{% endtabs %}
### Step 2: Add the SonarQube Cloud analysis to your monorepo’s CI pipeline
To perform the configuration, follow the procedure for your CI service:
* [Github Actions](/sonarqube-cloud/analyzing-source-code/ci-based-analysis/github-actions-for-sonarcloud.md)
* [Bitbucket Pipelines](/sonarqube-cloud/analyzing-source-code/ci-based-analysis/bitbucket-pipelines-for-sonarcloud.md)
* [Introduction](/sonarqube-cloud/analyzing-source-code/ci-based-analysis/azure-pipelines/introduction.md) to Azure pipelines
* [GitLab CI](/sonarqube-cloud/analyzing-source-code/ci-based-analysis/gitlab-ci.md)
* [CircleCI](/sonarqube-cloud/analyzing-source-code/ci-based-analysis/circleci.md)
* [Other CIs](/sonarqube-cloud/analyzing-source-code/ci-based-analysis/other-cis.md)
In the build procedure for each monorepo project, make sure to specify the SonarQube Cloud project key that you designated for it. This provides the binding between the project within the monorepo and the corresponding project in SonarQube Cloud. This enables SonarQube Cloud to correctly process the analysis results and to dispatch pull request decorations back to the DevOps platform for each project individually; see the [Pull request analysis](/sonarqube-cloud/analyzing-source-code/pull-request-analysis.md) page for information on decorating your pull request.
---
# Agent Instructions
This documentation is published with GitBook. GitBook is the documentation platform designed so that both humans and AI agents can read, navigate, and reason over technical content effectively. Learn more at gitbook.com.
## Querying This Documentation
If you need additional information that is not directly available in this page, you can query the documentation by asking a question.
Perform an HTTP GET request on the following URL with the `ask` and `goal` query parameters:
```
GET https://docs.sonarsource.com/sonarqube-cloud/analyzing-source-code/monorepo-support.md?ask=&goal=
```
`ask` is the immediate question: it should be specific, self-contained, and written in natural language.
`goal` is what the user is ultimately trying to achieve, the reason they need the answer. Sharing it helps GitBook give you a better, more relevant answer. A goal is most helpful when it describes the outcome the user wants rather than restating the question. For example, with `ask=how do I create an API token`, a goal like `automate deployments from our CI pipeline` lets GitBook tailor the answer to that use case.
The response will contain a direct answer to the question and relevant excerpts and sources from the documentation.
Use this mechanism when the answer is not explicitly present in the current page, you need clarification or additional context, or you want to retrieve related documentation sections.