> For the complete documentation index, see [llms.txt](https://docs.sonarsource.com/llms.txt). Markdown versions of documentation pages are available by appending `.md` to page URLs; this page is available as [Markdown](https://docs.sonarsource.com/sonarqube-server/2025.3/instance-administration/authentication/saml/ping-identity/setup-in-ping-identity.md).
# Setup in Ping Identity
This page explains how to register SonarQube Server in PingOne (or PingFederate).
This page explains how to register SonarQube Server in PingOne. The procedure with PingFederate is similar as the properties and values to be configured are the same.
This is the first step of SAML authentication setup with Ping Identity. For an overview of the complete setup, see [Introduction to SAML with Ping Identity](/sonarqube-server/2025.3/instance-administration/authentication/saml/ping-identity/introduction.md).
## Step 1: Create the SAML application for SonarQube Server
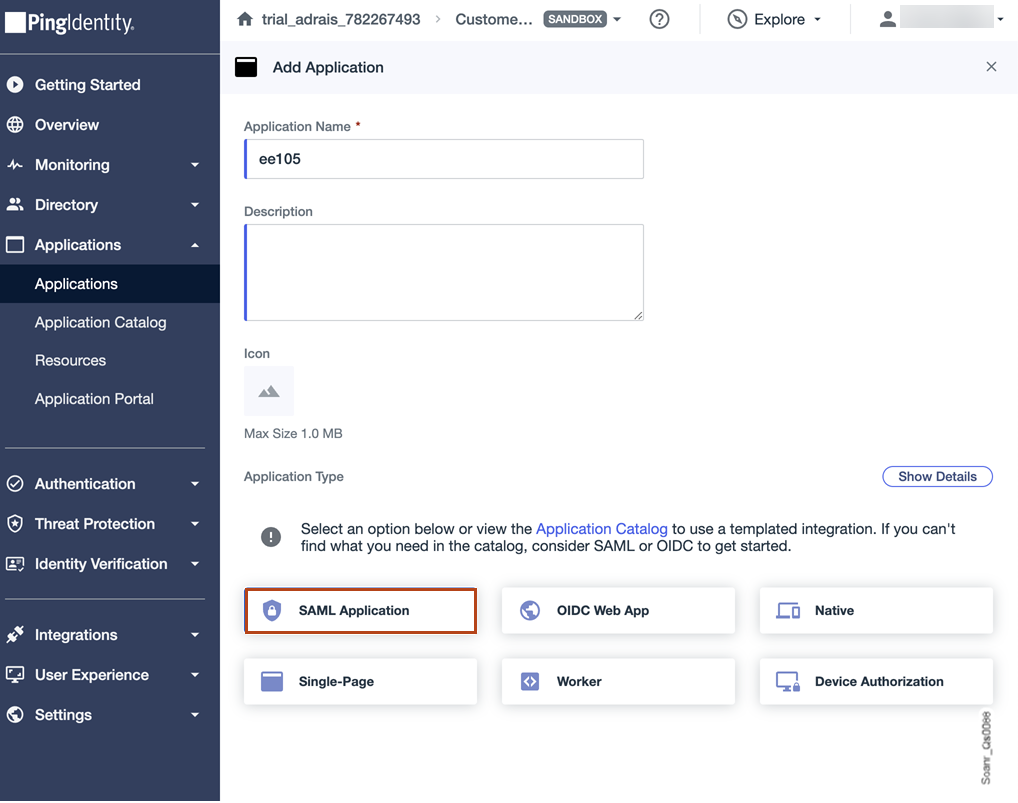
1. In PingOne, go to **Applications > Applications**.
2. Select the **+** icon.
3. Enter the application name and description.
4. In **Choose Application Type**, select **SAML Application**.
5. Select **Configure**.
6. Select the **Manually Enter** option and set:
* **ACS URL** (Assertion Consumer Service): Must be in the format: `/oauth2/callback/saml`\
\
\
\
\
Example: `https://my-sonarqube.com/oauth2/callback/saml`
* **Entity ID:** Identifier of the application for SonarQube Server in PingOne\
Example: `sonarqube`
7. Select **Save**.
## Step 2: Configure the application
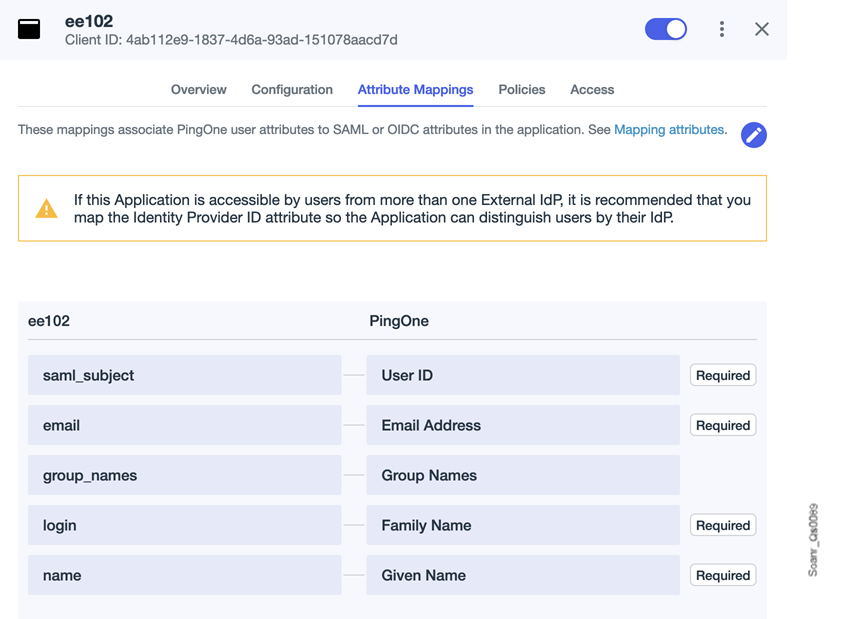
1. Go to the **Attribute mappings** tab of the application for SonarQube Server you created in step 1 (To retrieve the application, go to **Applications > Applications** and open the application details page.**)**.
2. Select the pencil icon and the **+Add** button to add an attribute mapping: select a PingOne user attribute and map it to an attribute in the application. See the example below.
SAML attribute mapping example
| SAML attribute in the application | PingOne user attribute | Description |
| --------------------------------- | ---------------------- | -------------------------------------------------------------------------------------------------------------------------------------------------------------------------------------------------------------------------------------------------- |
| saml\_subject | User ID |
|
| login | Family Name | A unique name to identify the user in SonarQube Server. |
| name | Given Name | User name. |
| email | Email Address | User email address. |
|
group\_names
| Group Names | Required only if you use the group synchronization feature with Just-in-Time provisioning. See [Overview of authentication and provisioning](/sonarqube-server/2025.3/instance-administration/authentication/overview.md#justintime-provisioning). |
3. Select **Save**.
4. Go to the **Configuration** tab and select the **Download Metadata** button to download the SAML metadata containing your X.509 certificate.
## Step 3: Enable the application
1. In PingOne, retrieve the application: go to **Applications > Applications** and open the application details page.
2. In the top right corner of the application, select the toggle button.
## Step 4: Assign users and groups to the application
1. To create users, go to **Identities > Users** and select **+ Add User**.
2. To create a group:
* Go to **Identities > Groups.**
* Select **+** to create and save a group.
* On the page of the new group, open the **Users** tab, and add users to the group.
## Related pages
* [Overview of SAML support](/sonarqube-server/2025.3/instance-administration/authentication/saml/overview.md)
* [Setup in SonarQube Server](/sonarqube-server/2025.3/instance-administration/authentication/saml/ping-identity/setup-in-sq.md)
* [Setup of security features](/sonarqube-server/2025.3/instance-administration/authentication/saml/ping-identity/optional-security-features.md)
---
# Agent Instructions
This documentation is published with GitBook. GitBook is the documentation platform designed so that both humans and AI agents can read, navigate, and reason over technical content effectively. Learn more at gitbook.com.
## Querying This Documentation
If you need additional information that is not directly available in this page, you can query the documentation dynamically by asking a question.
Perform an HTTP GET request on the current page URL with the `ask` query parameter, and the optional `goal` query parameter:
```
GET https://docs.sonarsource.com/sonarqube-server/2025.3/instance-administration/authentication/saml/ping-identity/setup-in-ping-identity.md?ask=&goal=
```
`ask` is the immediate question: it should be specific, self-contained, and written in natural language.
`goal` is optional and describes the broader end goal you are ultimately trying to accomplish on behalf of the user. GitBook uses it to tailor the answer towards what is most useful for that goal.
The response will contain a direct answer to the question and relevant excerpts and sources from the documentation.
Use this mechanism when the answer is not explicitly present in the current page, you need clarification or additional context, or you want to retrieve related documentation sections.