Was this page helpful?
Secrets
Secrets are pieces of user-specific or system-level credentials that should be protected and accessible to legitimate users only. SonarQube detects exposed Secrets in all files processed by the language analyzers and in all files configured through the sonar.text.inclusions property.
Secrets analysis is available starting in Community Edition.
Configuring secret-specific parameters (general procedure)
Discover and update the secret-specific parameters in Administration > Configuration > General Settings > Languages > Secrets.
Adjusting the secret detection scope
By default, SonarQube detects exposed secrets in all files processed by the language analyzers. You can refine the scope of the secret detection by:
- Adding files based on path-matching patterns.
- Adjusting the binary file exclusion setup.
Adding files based on path-matching patterns
If you’re using a git repository, you can add files to the secret detection scope by defining path-matching patterns: the files matching the patterns will be included provided they are tracked by git.
If the analysis is executed on a UNIX environment, files and directories starting with a dot are not analyzed since such files are treated as hidden in UNIX systems.
To add additional files to the secret detection:
- In the SonarQube UI:
- For a global configuration: go to Administration > Configuration > General Settings > Languages > Secrets.
- For a project-level configuration: open your project page and go to Project Settings > General Settings > Languages > Secrets.
- Enable the Activate inclusion of custom file path patterns option.
- In the List of file path patterns to include, adjust the default path-matching patterns if necessary (see Wildcard patterns in Analysis scope).
Alternatively, configure the parameters listed below on the CI/CD host (see Analysis parameters for more information).
| Property | Description |
|---|---|
sonar.text.inclusions.activate | Enables the inclusion of files to the secret detection according to the path-matching patterns defined in sonar.text.inclusions. |
sonar.text.inclusions | Comma-separated list of path-matching patterns. Possible values: A path can be relative (to the Default value: **/*.sh,**/*.bash,**/*.zsh,**/*.ksh,**/*.ps1,**/*.properties, **/*.conf,**/*.pem,**/*.config,.env,.aws/config |
Adjusting the binary file exclusion setup
SonarQube excludes binary files from the analysis. In case binary file types are still included in your analysis, you can exclude these additional files.
To do so:
- In the SonarQube UI,
- For a global configuration: go to Administration > Configuration > General Settings > Languages > Secrets.
- For a project-level configuration: open your project page and go to Project Settings > General Settings > Languages > Secrets.
- In Additional binary file suffixes, enter the list of suffixes to be excluded.
Alternatively, configure the parameter below on the CI/CD host (see Analysis parameters for more information).
| Property | Description |
|---|---|
sonar.text.excluded.file.suffixes | Comma-separated list of additional binary file suffixes to be excluded. |
Defining custom secret patterns
The custom secret patterns feature is available starting in Enterprise Edition.
In order to detect secrets that are specific to your company, you can define custom rules based on your own secret patterns.
In a given custom rule, the secret detection is specified as follows:
- The secret patterns to detect are defined through regular expressions. A context can be added to restrict the matching.
- Specific files can be excluded from the secret detection based on the file name or content. This allows improving the detection accuracy and time.
- Obvious false-positive matches can be excluded from the detection results.
The main steps to create a custom rule are:
- Define and test the regular expressions matching the secrets to detect.
- Specify the rule’s secret detection in YAML format.
- Create the corresponding secret detection rule in SonarQube and add it to your quality profile for secrets.
These steps are described below.
Define the regular expressions matching the secrets to detect
Define and validate the regular expression(s) matching the secrets to be detected by your custom rule.
Warning: Because it’s easy to make a mistake while writing regular expressions, we strongly recommend you validate your regular expressions before deploying them at scale and impacting all your projects.
To build, test, and debug regular expressions, we recommend that you use https://regex101.com/.
In addition, you can apply the Sonar’s rules dedicated to regular expressions to your regular expressions to make sure there are no mistakes and no performance problems, and possibly to find out a simpler way to write the same regular expression. To do so, proceed as follows:
Step 1: Create a small Java project (since the secret detection feature uses Java) and put your regular expressions into it. In the project example below, replace CustomRegExpExample with your regular expression.
import java.util.regex.Pattern;
public class CustomSecretRegExpCheck {
public static void main(String[] args) {
CustomSecretRegExpCheck checker = new CustomSecretRegExpCheck();
final String INPUT = "Hello, World!";
System.out.println("Result: " + checker.isMatchingCustomRegExpExample(INPUT));
}
public boolean isMatchingCustomRegExpExample(String input) {
Pattern pattern = Pattern.compile("CustomRegExpExample.*");
return pattern.matcher(input).find();
}
}Step 2: Run a SonarQube analysis on your project. Note that if you use an IDE running SonarLint, you will get immediate feedback and this step is not necessary.
Specify the rule’s secret detection in YAML format
You must specify the secret detection in YAML format according to the Detection section of this schema. This section consists of three subsections:
pre: Defines the files to be excluded from the secret detection based on file name or content.matching: Contains the regular expressions used to detect the secrets.post: Defines the obvious false-positive to be excluded from the matching candidates.
For examples of these three subsections, see the configuration of more than 60 secret detection rules provided out of the box with SonarQube here. To contribute, see CONTRIBUTING.md.
Examples of the matching subsection
To match a string corresponding to MyCustomSecret_123, a minimal configuration would be :
matching:
  pattern: "MyCustomSecret_\\d{3}"
You can also restrict the detection to particular contexts. For example, if you want to detect MyCustomSecret_123 only if:
- either preceded by beforeContext
- or followed by afterContext
Then, you could use the following matching configuration:
matching:
  pattern: "MyCustomSecret_\\d{3}"
  context:
    matchEither:
      - patternBefore: "beforeContext"
      - patternAfter: "afterContext"
Create the corresponding secret detection rule in SonarQube
You can now create the corresponding custom rule in SonarQube. To do so, you'll create an instance of the rule template S6784: User-specified secrets should not be disclosed.
Proceed as follows:
Step 1: In the top navigation bar of SonarQube, click Rules.
Step 2: Set the rule search filter as follows:
- In the Language option, select Secrets.
- In the Template option, click Show Templates Only.
Step 3: In the search results, click the User-specified secrets should not be disclosed rule.
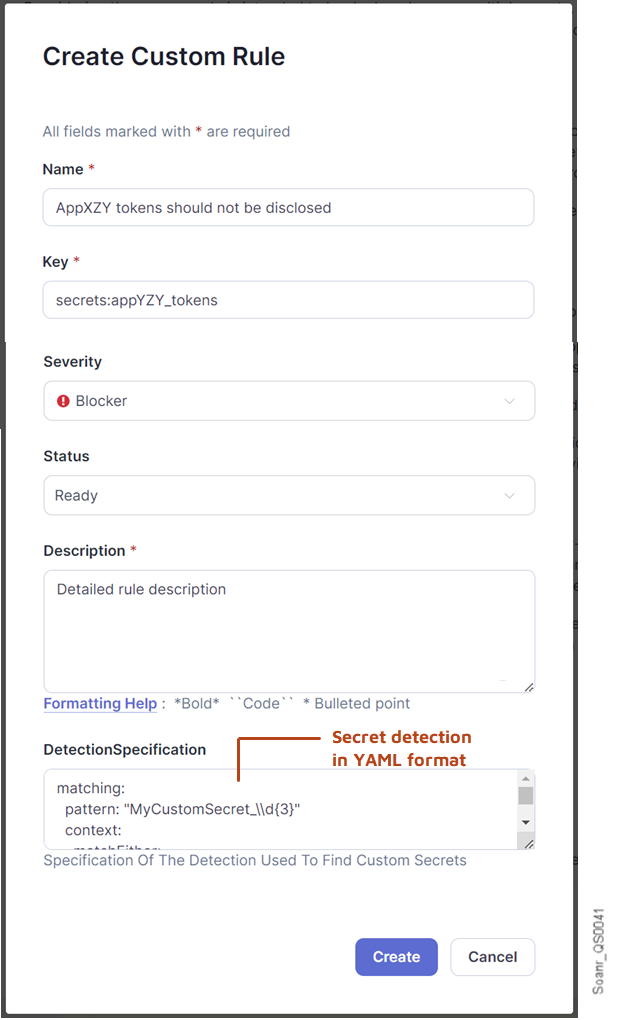
Step 4: At the bottom of the rule page, in the Custom Rules section, click Create. The Create Custom Rule dialog opens.
Step 5: Fill in the rule parameter fields:
- Name: Rule title.
We recommend making it very explicit about the service, department, and in-house application.
Example: AppXZY tokens should not be disclosed - Key: Unique identifier of the rule.
We recommend following a naming convention to make it easier to retrieve your custom secrets. - Type: Rule type. Default (recommended): Vulnerability.
- Severity: Rule severity. Default (recommended): Blocker.
- Status: Rule status. Default (recommended): Ready.
- Description: Rule description. The description should be as detailed as possible in order to allow the developer to know what to do in case of a secret detection. In this field, you can describe the procedure to be followed in your company for such cases.
- DetectionSpecification: Copy and paste into this field the specification you created in the Specify the rule’s secret detection in YAML format step as illustrated below.

Step 6: Click Create. The dialog closes and the new rule is created.
Step 7: Add the new rule to the quality profile that you use for secrets: see Quality Profiles. If you don’t already have a custom quality profile for secrets, you must create one (to do so, it’s strongly recommended to extend the Sonar way.).
Parallel code scan
By default, the analyzer tries to parallelize the analysis of compilation units; it spawns as many jobs as logical CPUs available on the machine.
If required, it is possible to customize the number of scheduled parallel jobs by configuring the property sonar.text.threads=n at the scanner level, where n is an integer indicating the maximum number of parallel jobs.
You should consider setting the sonar.text.threads property only when the automatic detection of the number of logical CPUs cannot detect the desired number. A typical example is when the analysis should not consume all the available computing resources to leave room for other tasks running in parallel on the same machine.
When setting the sonar.text.threads property, you should set it to a value less or equal to the number of logical CPUs available. Over-committing doesn't accelerate the analysis and can even slow it down.
Related pages
- Adding coding rules
- Secrets rules for static code analysis
- Analysis scope - "Setting the secrets detection scope" section.
© 2008-2024 SonarSource SA. All rights reserved. SONAR, SONARSOURCE, SONARLINT, SONARQUBE, SONARCLOUD, and CLEAN AS YOU CODE are trademarks of SonarSource SA.