Step 3: Configure the Azure Front Door
This page explains the third step of the disaster recovery setup for the Data Center Edition (DCE) deployed on Kubernetes. The setup instructions are based on an architecture example with Azure Kubernetes Service.
Step 1: Create an Azure Front Door
Create an Azure Front Door as follows (see also the Azure documentation):
1. In the Azure portal, create a new Azure Front Door by using the Quick create option. The Create a Front Door profile page opens.
2. In Project details, select your subscription and resource group.
3. In Profile details, enter your profile name
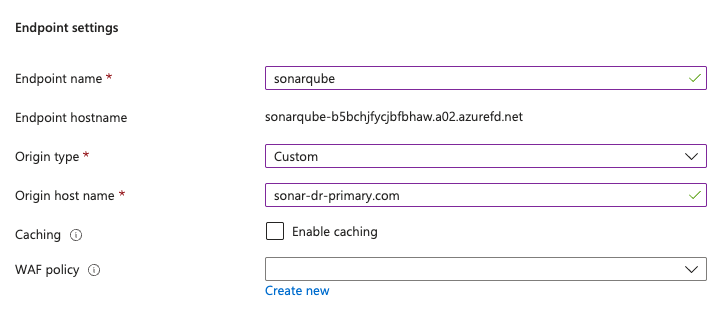
4. In Endpoint settings:
- In Endpoint name, enter a name for your endpoint. This is the domain where users will access your SonarQube Server instance. Azure creates a *.azurefd.net domain for your endpoint by default. You can modify this setting to use your own domain on the Front Door settings.
- In Origin type, select Custom.
- In Origin host name, enter the FQDN of your primary cluster Ingress. You’ll add the Replica origin once the Front Door is created along with the origin group.
- Leave Caching and WAF policy with the default settings.

5. Select the Review + create button.
6. Go back to the overview page and select the newly created Front Door.
7. Go to Origin Groups > Origin group name

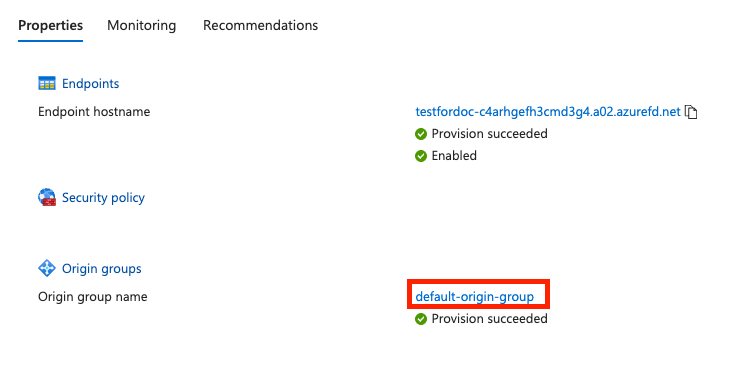
8. Select your origin group from the list (the origin group is automatically created with default name default-origin-group). The Update origin group page opens.
9. Select Add an origin.

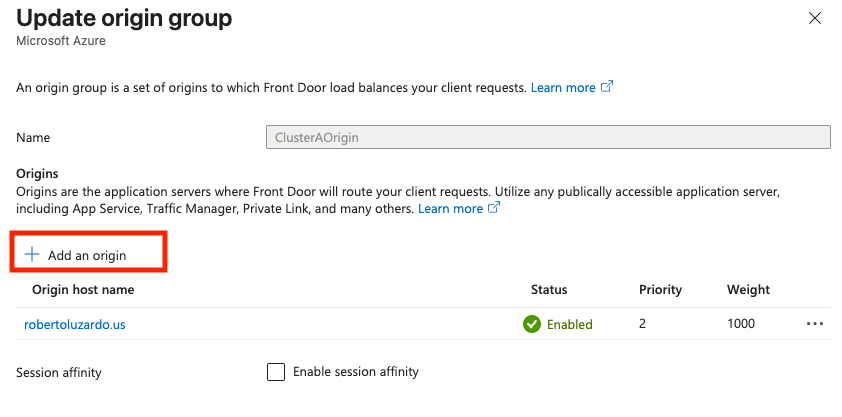
10. Set the parameters of the new origin:
- In Name, enter a name for the Replica origin.
- In Origin type, select Custom.
- In Host name, enter the DNS name of your Replica cluster Ingress.
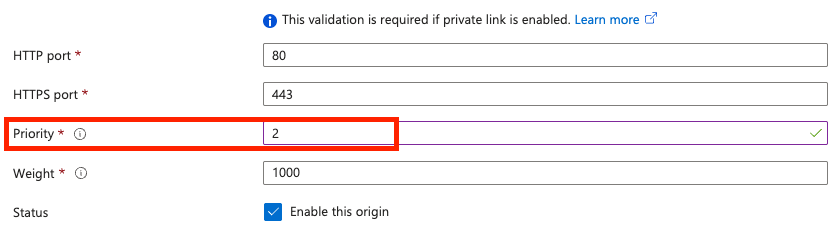
- Leave Origin host header blank.
- In Certificate subject name validation, select Enable the validation.
- Leave HTTP port and HTTPS port with the default values.
- In Priority, enter 2.
- Leave Weight and Status with the default values.

Step 2: Configure an alert rule for the origin group
You can set up an alert for your origin group that triggers whenever your origin health goes under a specific threshold. The alert can optionally send an email to the SonarQube Server Administrator or start an automation runbook to perform additional actions, if required.
To configure an alert rule for the origin group:
- Select your Front Door.
- In Monitoring, select Alerts.
- Select Create Alert rule.
- In Signal name, select Origin Health Percentage.
- In Aggregation type, select Average.
- In Threshold, select 99%.
- In Split by dimensions :
- In Dimension name, select Origin.
- In Operator, select =.
- Select your primary SonarQube Origin Group as Dimension values.
- In When to evaluate, select the values based on your requirements.
- Select the Next:Actions button.
- In Select actions, select Use action groups.
- In Action groups, select Select action groups and then Create action group.
- Select the correct subscription and resource group and give a name of your choice for the action group name and display name.
- Select the Next:Notifications button.
- Select a notification type. At a minimum, select Email/SMS message/Push/Voice to receive an email whenever the alert is triggered.
- Optionally, select Actions and select an automation runbook with a script to power on the replica cluster. To create an automation runbook, see below.
Creating an automation runbook
This section explains how to create an automation runbook triggered by an alert rule created for the Front Door origin containing your primary cluster. This runbook powers on the replica cluster in case of an outage of the primary cluster.
The following steps are listed in this guide as a reference only. Sonar recommends a manual power-on of the replica cluster in the event of a disaster, as this is a sensitive operation that could impact your RTO goals.
Step 1: Create an automation account
Proceed as follows (see also the Azure documentation):
- In your Azure portal, navigate to Automation Accounts and select Create.
- Select your subscription and resource group.
- In Instance Details, enter a name and select a region for your Automation Account.
- Select the Advanced tab to select the managed identity option. This identity is needed for the Runbooks associated with this account to connect and run operations on your clusters. You can either use a System-assigned or a User-assigned identity.
If using an identity option, make sure you set the correct Azure role permissions to your SonarQube clusters. - Select the Review + Create button.
Step 2: Create a runbook
- Go to your automation account.
- In Process Automation, select Runbooks and Create a runbook.
- Enter the runbook name.
- In Runbook type, select PowerShell.
- In Runtime version, select 7.2.
- Use the following sample PowerShell script to power on the replica cluster:
# This script starts an Azure Kubernetes Service (AKS) cluster using the Azure PowerShell module.
#variables
param(
[Parameter(Mandatory = $true)]
[string]$PrimaryClusterName,
[Parameter(Mandatory = $true)]
[string]$ReplicaClusterName,
[Parameter(Mandatory = $true)]
[string]$SubscriptionId,
[Parameter(Mandatory = $true)]
[string]$ManagedIdentityClientId,
[Parameter(Mandatory = $true)]
[string]$ResourceGroupName
)
#connect to Azure using managed identity
Connect-AzAccount -Identity -AccountId $ManagedIdentityClientId
#check the status of the AKS Primary cluster
$primaryCluster = Get-AzAksCluster -ResourceGroupName $ResourceGroupName -Name $PrimaryClusterName -SubscriptionId $SubscriptionId
if ($primaryCluster.ProvisioningState -ne "Succeeded" -or $primaryCluster.PowerState.Code -ne "Running") {
Start-AzAksCluster -ResourceGroupName $ResourceGroupName -Name $ReplicaClusterName -SubscriptionId $SubscriptionId
}
else {
Write-Output "Primary AKS cluster is still running. No action taken."
}Related pages
Was this page helpful?
© 2008-2025 SonarSource SA. All rights reserved.