Setting up SAML SSO with Okta
To transition your enterprise to SAML SSO with Okta:
- Verify the user groups of your organizations.
- Follow Step 1 to Step 3 below.
- Terminate the SAML SSO setup.
Step 1: Create the SonarQube Cloud application
1. In Okta, under Applications, select Create App Integration.
2. In the Sign-in Method dialog, select SAML 2.0.
3. Select Create.
4. Fill in the fields and options as described below in the various steps.
Steps' fields and options
| Step | Field or option | Description |
|---|---|---|
| General settings | Application label | SonarQube Cloud application name. Example: SonarQube Cloud. |
| Do not display application icon to users | Select this option. (This is because SonarQube Cloud doesn't support IdP-initiated SSO). | |
| SAML settings | Single sign on URL | Copy-paste the SSO URL field from the SonarQube Cloud UI. To do so:
|
| Audience URI (SP Entity ID) | Copy-paste the SP Identity ID field from the SonarQube Cloud UI. Proceed as explained for the SSO URL field above. | |
| Response | Select Signed. | |
| Assertion Signature | Select Signed. | |
| Signature Algorithm | Select RSA-SHA256. | |
| SAML settings: Advanced settings | If you want to enable assertion encryption, expand Show Advanced Settings | |
| Assertion Encryption | Select Encrypted. | |
| Encryption Algorithm | Select AES256-GCM for high security. | |
| Key Transport Algorithm | Select RSA-OAEP. | |
| Encryption Certificate | The public X.509 certificate used by the identity provider to authenticate SAML messages. |
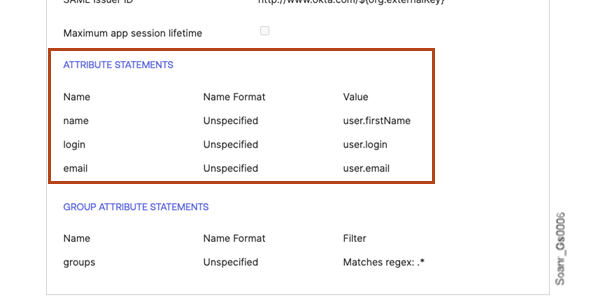
5. Under Attribute Statements, add three attribute mappings as described below.
Attribute statements mappings
| Mapping for name | Mapping for login | Mapping for email (optional) | |
|---|---|---|---|
| Name | name | login | |
| Name format | Unspecified | Unspecified | Unspecified |
| Value | user.displayName | user.login | user.email |
6. Under Group Attribute Statements, enter the values as described below.
Group attribute statements values
| Group Attribute Statements | |
|---|---|
| Name | groups |
| Name format | Unspecified |
| Filter | Choose Matches regex and set the value to .*. |
7. In the Feedback dialog, select Finish to confirm the creation of the SonarQube Cloud application.
Step 2: Set up the group synchronization
In Okta:
- Go to the Assignments tab of the SonarQube Cloud application and assign the user groups to the SonarQube Cloud application.
- Enable the group synchronization in the SonarQube Cloud application:
- Go to SAML > Provisioning.
- In the SAML group attribute field, enter
groups(Name value of the Group Attribute Statements)
Step 3: Configure SAML SSO in SonarQube Cloud
You must be the administrator of the enterprise in SonarQube Cloud.
Proceed as follows:
1. In SonarQube Cloud, retrieve your enterprise.
2. Select Administration > SAML Single Sign On (SSO). The SAML SSO page opens.
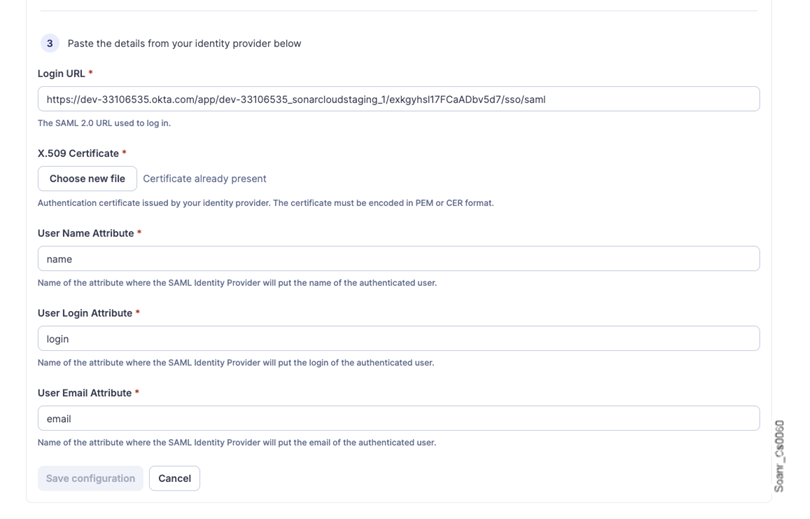
3. On the page, navigate to step 3 of the SAML configuration section.
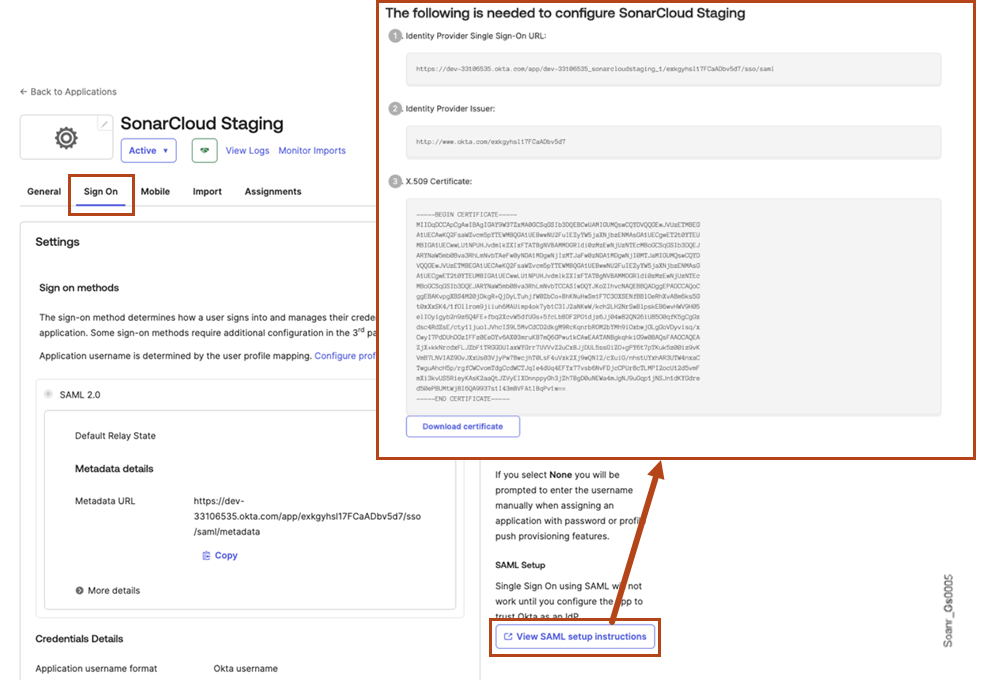
4. In Okta, go to the Sign On tab of the SonarQube Cloud application.
2. Next to the SAML Signing Certificates subsection, select the View SAML setup instructions button.

3. Copy the Identity Provider Single Sign-On URL value to SonarQube Cloud’s Login URL field.
4. In X.509 Certificate, download the certificate and upload it to SonarQube Cloud’s X.509 Certificate field by selecting the Choose file button.
5. In Okta, go to the General tab of the SonarQube Cloud application.
6. On the page, navigate down to SAML Settings > Attribute Statements.

7. In SonarQube Cloud, fill in User Name Attribute, User Login Attribute, and User Email Attribute with the corresponding attribute name in Okta's Attribute Statements section.

8. Select Save configuration. SonarQube Cloud is trying to connect to your Identity Provider. If the connection is established, the page collapses to the essential SAML settings.
Was this page helpful?