Setting up your enterprise
With the Enterprise subscription plan, you can group together SonarQube Cloud organizations from different DevOps platforms into an enterprise and benefit from many features.
This page explains how to set up your enterprise from scratch. To add new organization to your enterprise, see Managing your enterprise.
Step 1: Prepare the enterprise onboarding
Each organization in the enterprise must be assigned to the Enterprise subscription plan. To do so, an enterprise coupon corresponding to your chosen Enterprise plan level is applied to each organization.
If you haven't yet onboarded your organizations into SonarQube Cloud, see Creating your organizations below first. Otherwise, go directly to Assigning the Enterprise plan to your organizations below.
Creating your organizations (Free plan)
If not already done, you must create in SonarQube Cloud the organizations to be added to your enterprise. You create first a Free plan organization and then assign to it the Enterprise plan in Assigning the Enterprise plan to your organizations below.
To create an organization in SonarQube Cloud, import the DevOps platform organization. See:
Assigning the Enterprise plan to your organizations
- For each organization you want to include in the enterprise, select the number of Lines of Codes (LOC) of the Enterprise plan you want to purchase: see LOC-based pricing in Subscription plans for information about the LOC threshold.
- Contact our team to purchase the corresponding Enterprise coupons. You will need to provide the key of each organization that will be part of the enterprise (The key is displayed at the far right of the Organization's navigation bar, see Retrieving your organizations.).
- When possible, our team will apply the coupons to your organizations. If it’s not the case, once you have received the coupons, apply the coupon to an organization as follows:
- In SonarQube Cloud UI, retrieve the organization.
- Open the Billing & Upgrade tab.
- In Already have a coupon?, select apply it directly here.
Step 2: Create the SonarQube Cloud enterprise by upgrading one of your organizations
To create an enterprise, you upgrade to an enterprise one of the organizations you prepared in Step 1.
You must be an admin of this organization. Once you've created the enterprise, you become an enterprise admin automatically.
To create your enterprise:
- In SonarQube Cloud UI, retrieve the organization to be upgraded to an enterprise.
- Open the Billing & Upgrade tab.
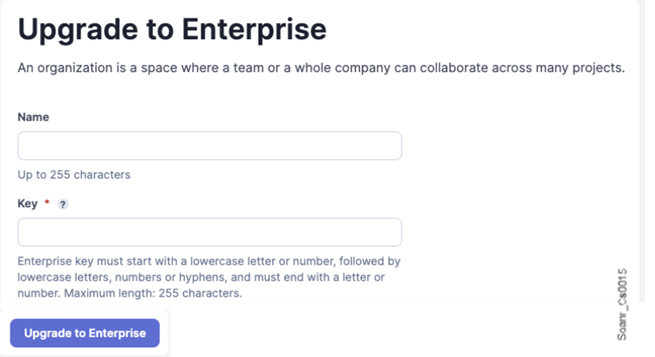
- In Enterprise, select Upgrade to Enterprise. The Upgrade to Enterprise page opens.
- Enter the enterprise name and key, and select Upgrade to Enterprise. The enterprise is created.

Step 3: Add the other organizations to your enterprise
You can now add the other organizations you prepared in Step 1 to your enterprise. To perform this step, you must be an admin of both the enterprise and the organization to be added.
To add an organization to your enterprise:
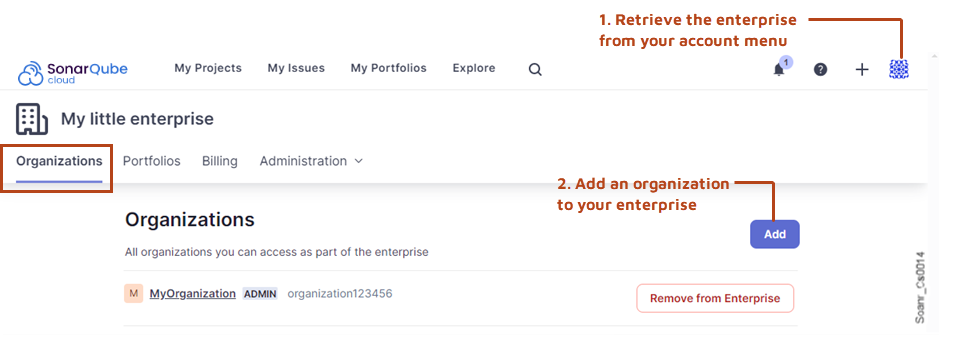
- Retrieve your enterprise in SonarQube Cloud UI:
- Select your account menu in the top right corner.
- In the menu, under My Enterprises, select the enterprise. The Organizations page of the enterprise opens.
- Select the Add button. The Add an organization dialog opens.
- Select the organization to be added and select the Add button.
If you cannot see your organization, it probably means that your enterprise admin account is not admin of the organization. It may be the case if you imported your organization by using another user account (for example, from another DevOps platform's account). In that case, see Using multiple accounts.

Step 4: Set the enterprise permissions of users
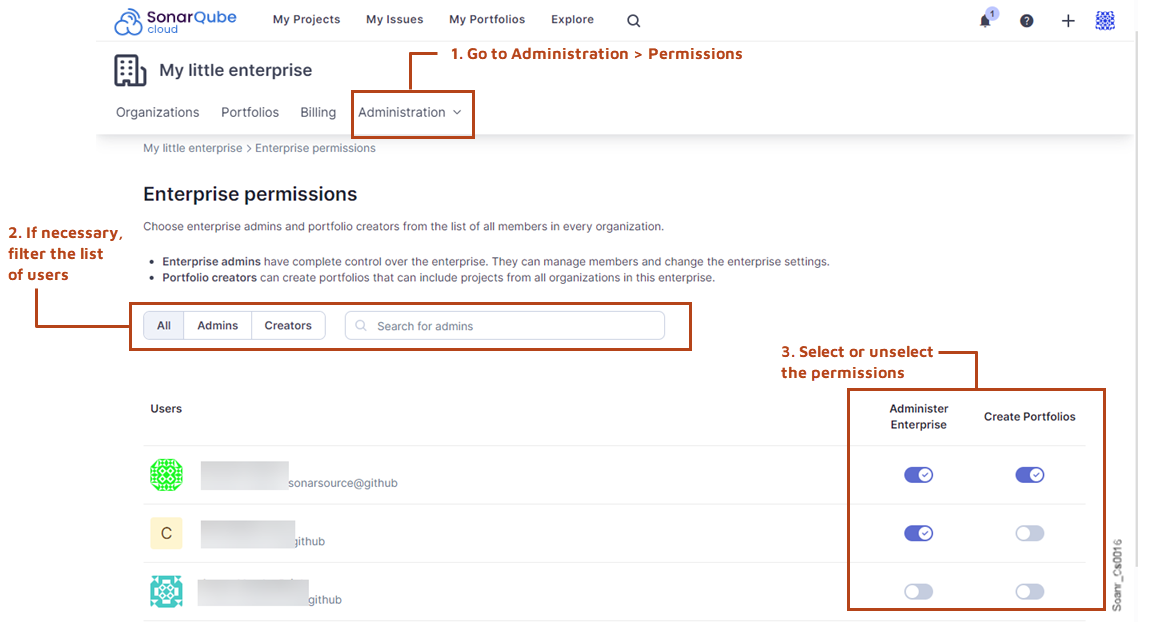
As an enterprise admin, you can grant the Administer Enterprise and Create portfolios permissions. For more information, see Managing the enterprise-related permissions in Managing your enterprise.
To set the enterprise-related permissions of users:
- Retrieve your enterprise. To do so:
- Select your account menu in the top right corner.
- In the menu, under My Enterprises, select your enterprise.
- Go to Administration > Permissions.
- If necessary, filter the list of users.
- For each user, select or unselect the permissions in the table.

Users in newly created enterprises do not automatically have permission to create portfolios, see Administering portfolios - Onboarding guide for how to set permissions
Step 5: Complete the enterprise onboarding
For each organization in your enterprise:
- If not already done, verify the groups' default permissions on new projects.
- You can set project configurations at the organization level.
If you want to transition your enterprise to SSO, see Setting up SSO.
Related pages
Was this page helpful?