Managing the lines of code within your enterprise
You must be an enterprise admin to be able to manage the lines of code (LOC) limits within your enterprise.
About the enterprise lines of code limit (Shared LOC and Allocated LOC)
Your enterprise license entitles you to a maximum lines of code (enterprise LOC limit). For more information about lines of code, see LOC-based pricing in Subscription plans.
By default, the enterprise LOC limit is shared by all organizations in the enterprise: the total LOC consumed by all organizations in the enterprise cannot exceed this limit.
You have the flexibility to allocate an individual LOC limit to one or more organizations within your enterprise (including the option to apply it to all): the LOC consumed by the organization cannot exceed the limit allocated to this organization. The other organizations in your enterprise will share the remaining LOC limit. For example, an enterprise with a total LOC limit of 5 M and containing 4 organizations may be configured as follows:
- Organization1 is allocated a 2M LOC limit.
- Organization2 is allocated a 1.3M LOC limit.
- Organization3 and Organization4 share the remaining LOC limit, i.e. 1.7 M.
We use the following concepts to refer to the different LOC limit uses:
- Shared LOC refers to the collective lines of code limit shared by organizations within the enterprise.
- Allocated LOC refers to the individual lines of code limits allocated to organizations within the enterprise.
This feature is not supported for enterprises created before 15 July 2025 and not migrated to the new setup process.
Allocating a LOC limit to an organization
You can allocate a LOC limit to an organization within your enterprise, as long as the enterprise LOC limit has not been fully allocated. The remaining LOC available for allocation are determined by subtracting already allocated LOC limits from the enterprise LOC limit.
To allocate a LOC limit to an organization within your enterprise:
- Retrieve your enterprise.
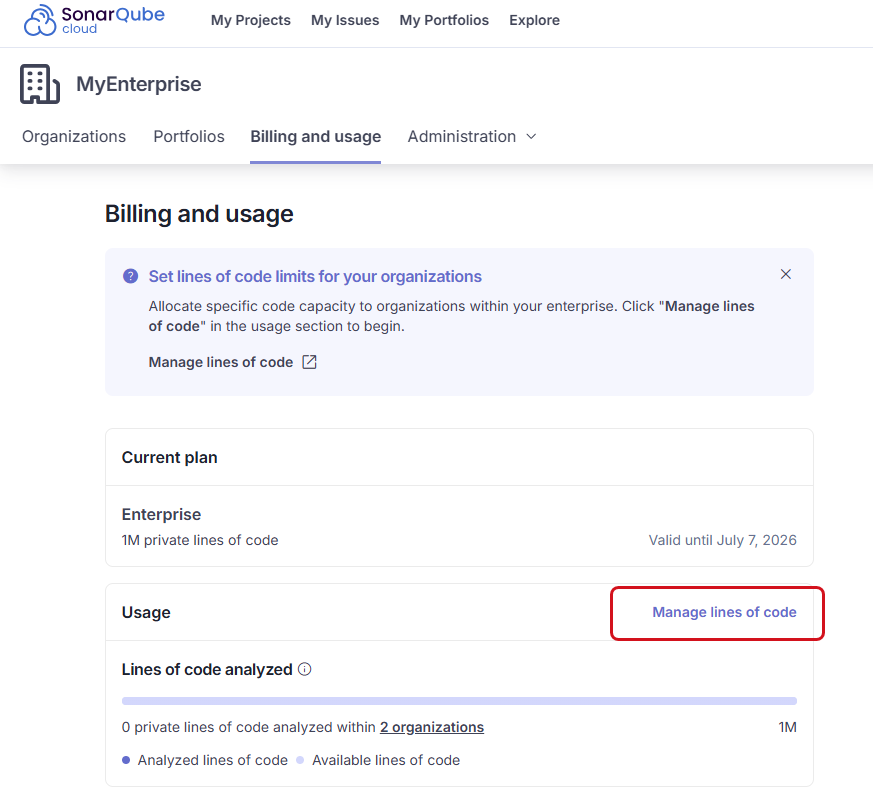
- Go to the Billing and usage tab.
- In front of Usage, select the Manage lines of code link.

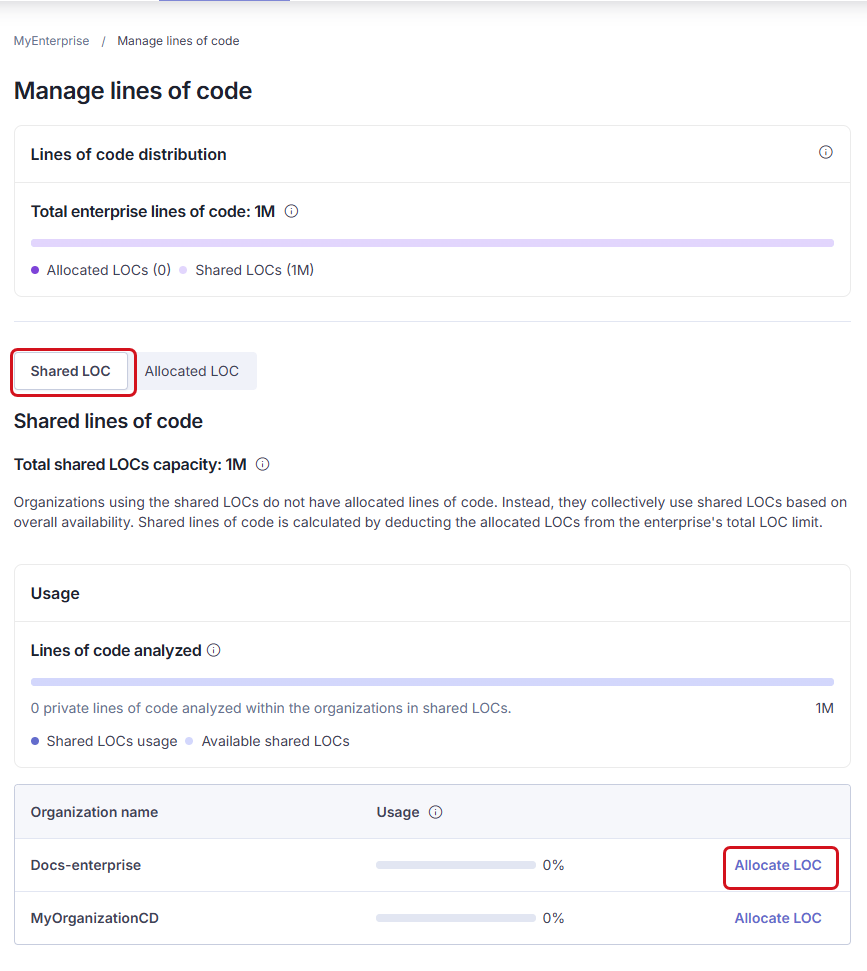
In the page that opens, the Shared LOC tab lists the organizations that use the shared LOC.
4. Locate the organization in the list (navigate to the next page if necessary) and select Allocate LOC. The corresponding dialog opens.
5. Enter the LOC limit value to be allocated and select Allocate LOC. The LOC limit is allocated and the organization is moved to the Allocated LOC tab.

Changing the LOC limit allocated to an organization
To change the allocated LOC limit of an organization within your enterprise:
- Retrieve your enterprise.
- Go to the Billing and usage tab.
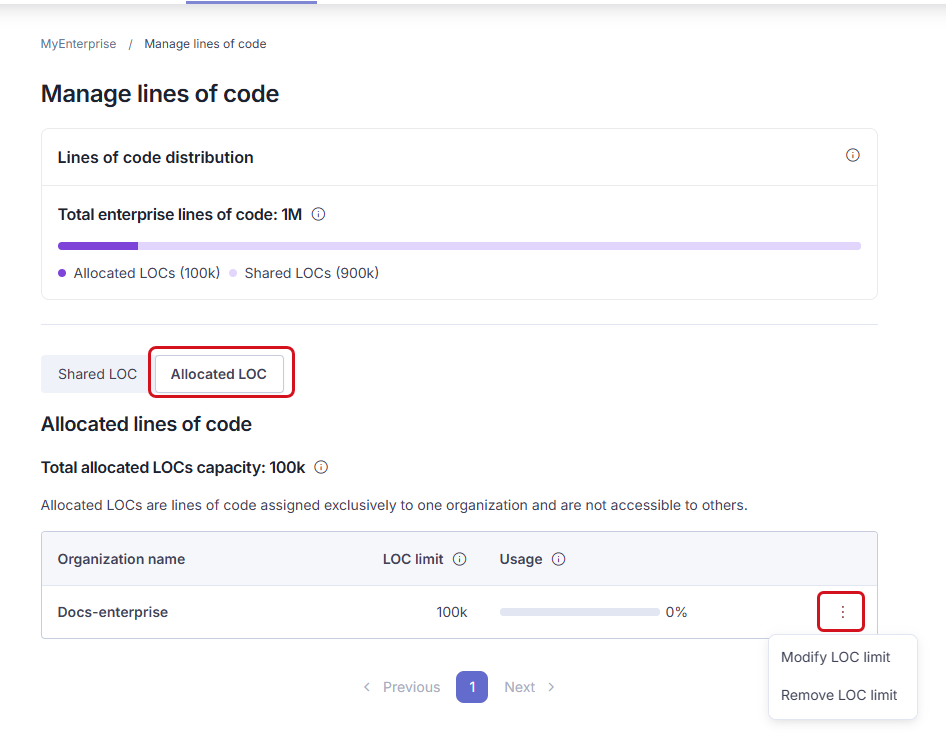
- In front of Usage, select the Manage lines of code link. In the page that opens, select the Allocated LOC tab. The tab lists the organizations using an allocated lines of code limit.
- Locate the organization in the list (navigate to the next page if necessary). Select the three-dot menu and then Modify LOC limit. The corresponding dialog opens.
- Enter the new LOC limit value and select Modify limit. The limit is changed.

Changing the enterprise LOC limit
To change your enterprise LOC limit, you must change your enterprise license: contact our team.
Removing the LOC limit allocated to an organization
To remove the allocated LOC limit of an organization within your enterprise:
- Retrieve your enterprise.
- Go to the Billing and usage tab.
- In front of Usage, select the Manage lines of code link. In the page that opens, select the Allocated LOC tab. The tab lists the organizations using an allocated lines of code limit.
- Locate the organization in the list (navigate to the next page if necessary). Select the three-dot menu and then Remove LOC limit. The confirmation dialog opens.
- Select Confirm removal. The allocated limit is removed and the organization is moved to the Shared LOC tab.
Viewing the lines of code consumption
- Retrieve your enterprise.
- Go to the Billing and usage tab.
- In front of Usage, select the Manage lines of code link. In the page that opens:
- The Shared LOC tab shows the consumption of the organizations using the shared LOC.
- The Allocated LOC tab shows the allocated LOC consumption for each organization.
Related pages
Was this page helpful?